If you own an condo apartment in a typical high-rise building, it very likely comes with concrete ceilings. Those ceilings are probably covered in some sort of texture—either the really rough popcorn texture which was popular in the 1970s and 1980s, or the lighter texture that’s still being applied today in the third decade of the 21st century. If you’ve removed the texture yourself, you have no-doubt realized that the ceilings are too rough and uneven to be paint-ready. Why is this, and what should be done next?
Why Are Concrete Ceilings So Uneven?
Concrete is poured into wood forms during construction
The concrete in your building has been poured into formworks, or molds, that are most often made from timber or plywood. These materials are flexible, and somewhat uneven. That means that your ceilings will also be somewhat uneven, and have blemishes from knots or other imperfections of the wood frame.
Rather than spend time grinding little bumps down, filling in holes, or making sure the ceiling is level, most builders just spray it with texture. Fast and cheap for them. To sum things up, scraped concrete ceilings are entirely unsightly, and are nowhere ready to receive the final decoration, which is usually primer and paint.
Holes in concrete
Rough concrete
The Best Way to Get a Smooth, Level Ceiling
Nine times out of ten, you’re going to save time and money in the long run when you hire a professional from the start; this is true whether it’s tiling a bathroom, installing cabinets, or removing popcorn ceilings. And it’s especially valid if those ceilings are concrete, for the reasons mentioned above. Ceiling experts have the tools and experience to accomplish in a few days what would take you a week or more when it comes to unfinished, scraped concrete ceilings. On top of that, it will look professional, instead of ending up looking like a DIY hack job.
But most importantly, if the building was built prior to 1980, there’s a relatively good chance that the ceiling texture could contain asbestos. Scraping the popcorn texture would cause the asbestos fibres to get airborne, which is when they’re most dangerous. Since the fibres are microscopic, the only way to tell if asbestos is present is to have the material tested at a certified lab. Any professional wall & ceiling contractor will be able to do this for you.
However, if you’ve already scraped the popcorn off of your ceilings yourself, that advice is probably not helpful at the moment. Don’t panic; most health problems associated with asbestos are seen in people who have worked in an asbestos-related industry and have had repetitive exposure to asbestos fibres. That being said, it’s always a good idea to monitor your health; have a doctor look into anything suspicious, especially any respiratory issues. Click hereto find out more about asbestos-related health issues.
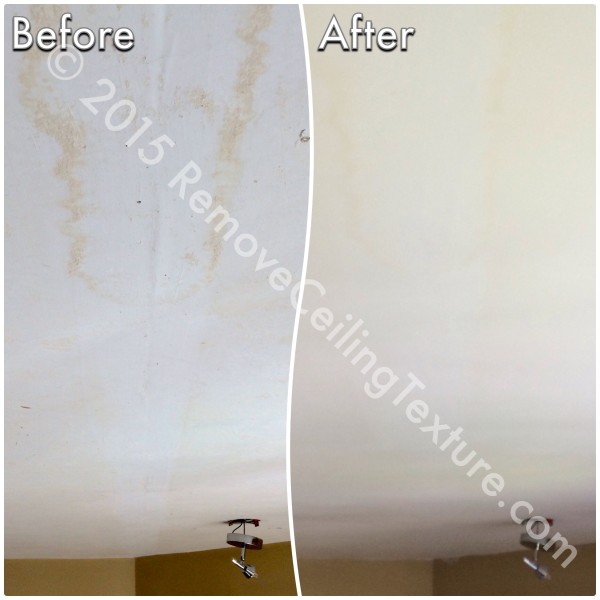
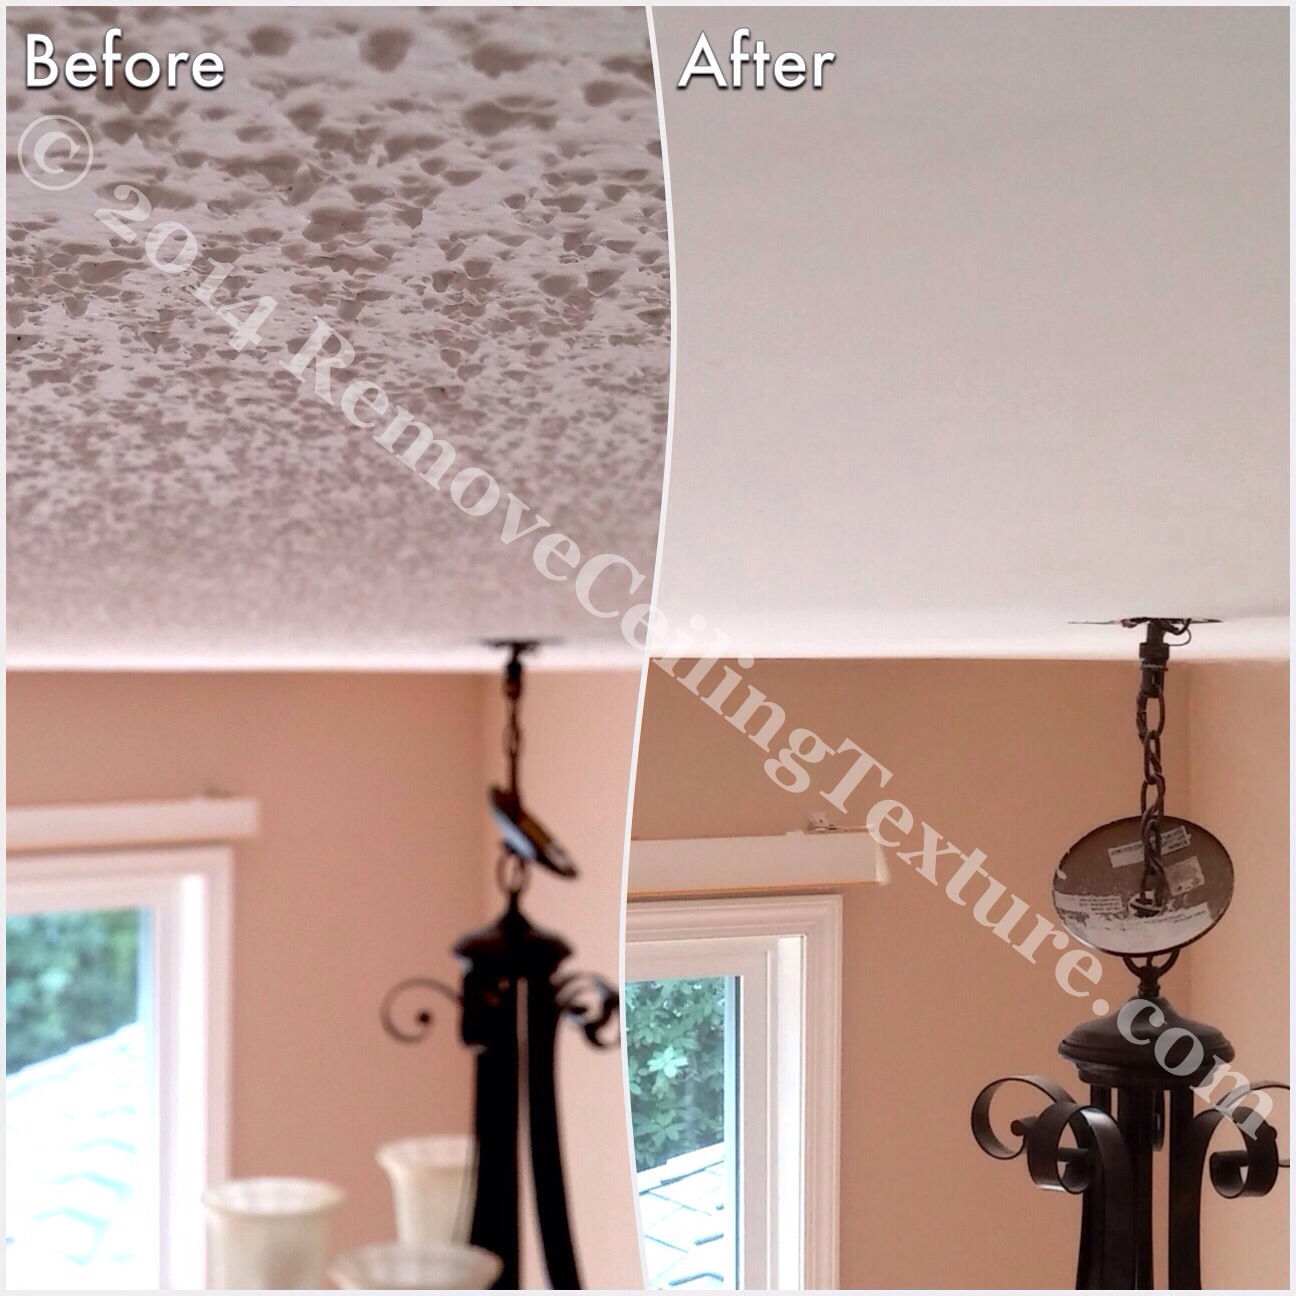
If you’ve scraped your concrete ceilings, are you stuck with the rough-looking, coarse surface? Not at all! A ceiling expert can still create a flawless surface for you.
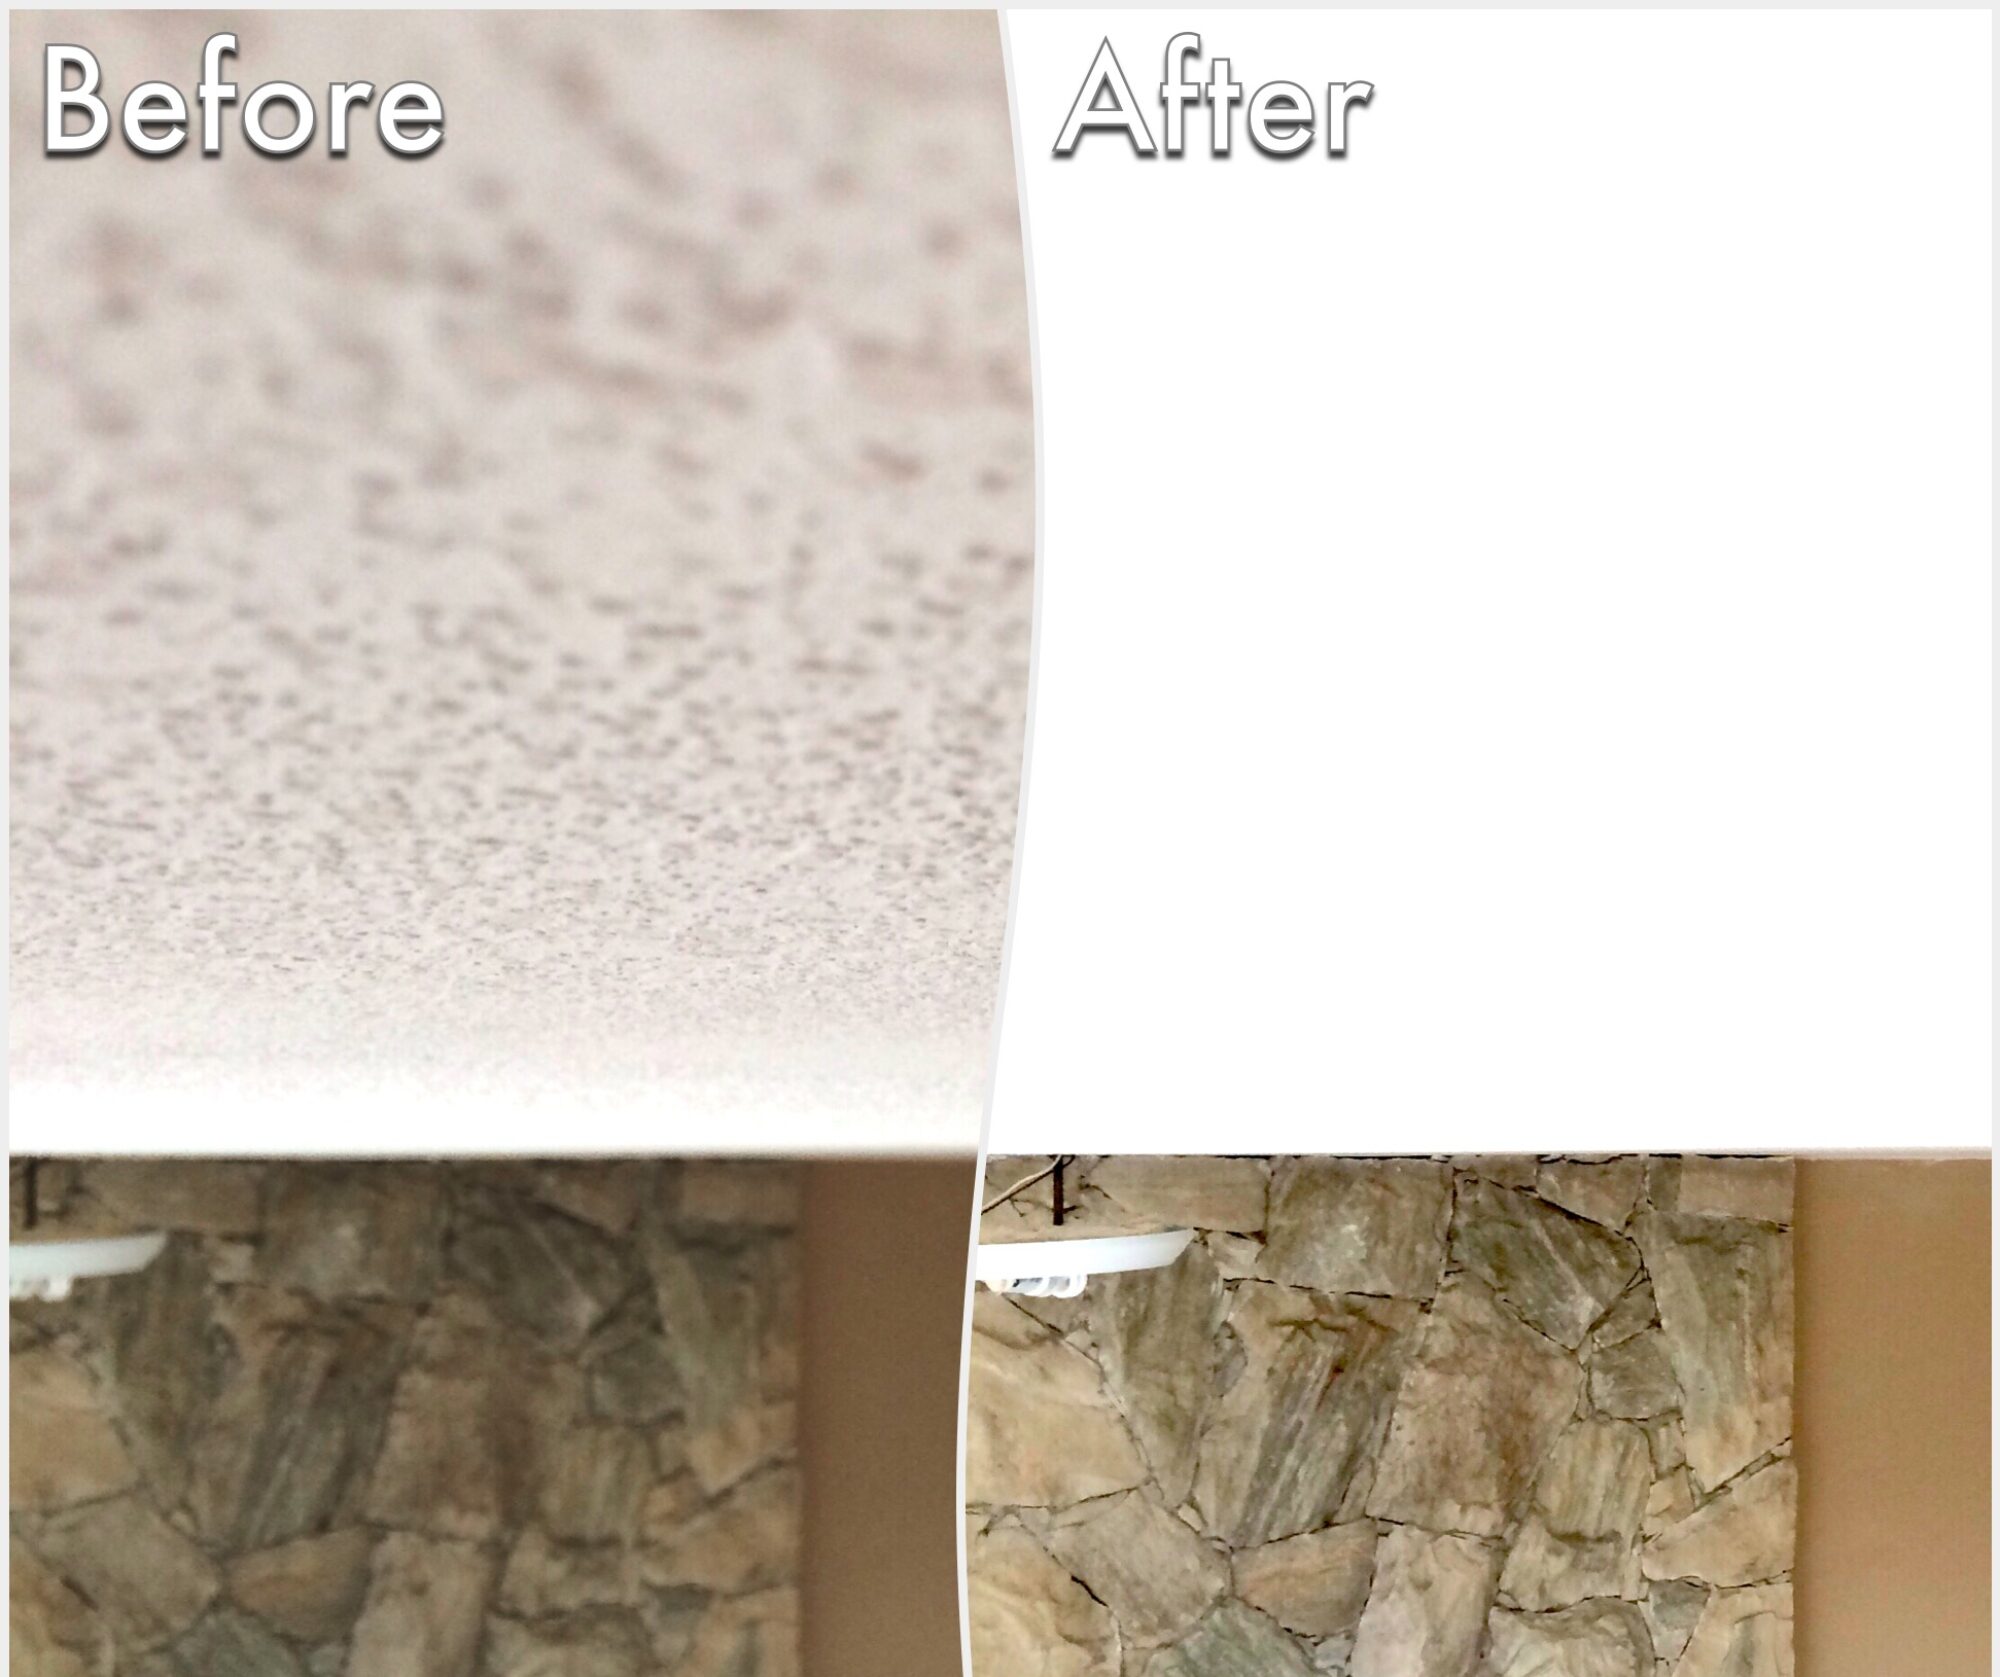
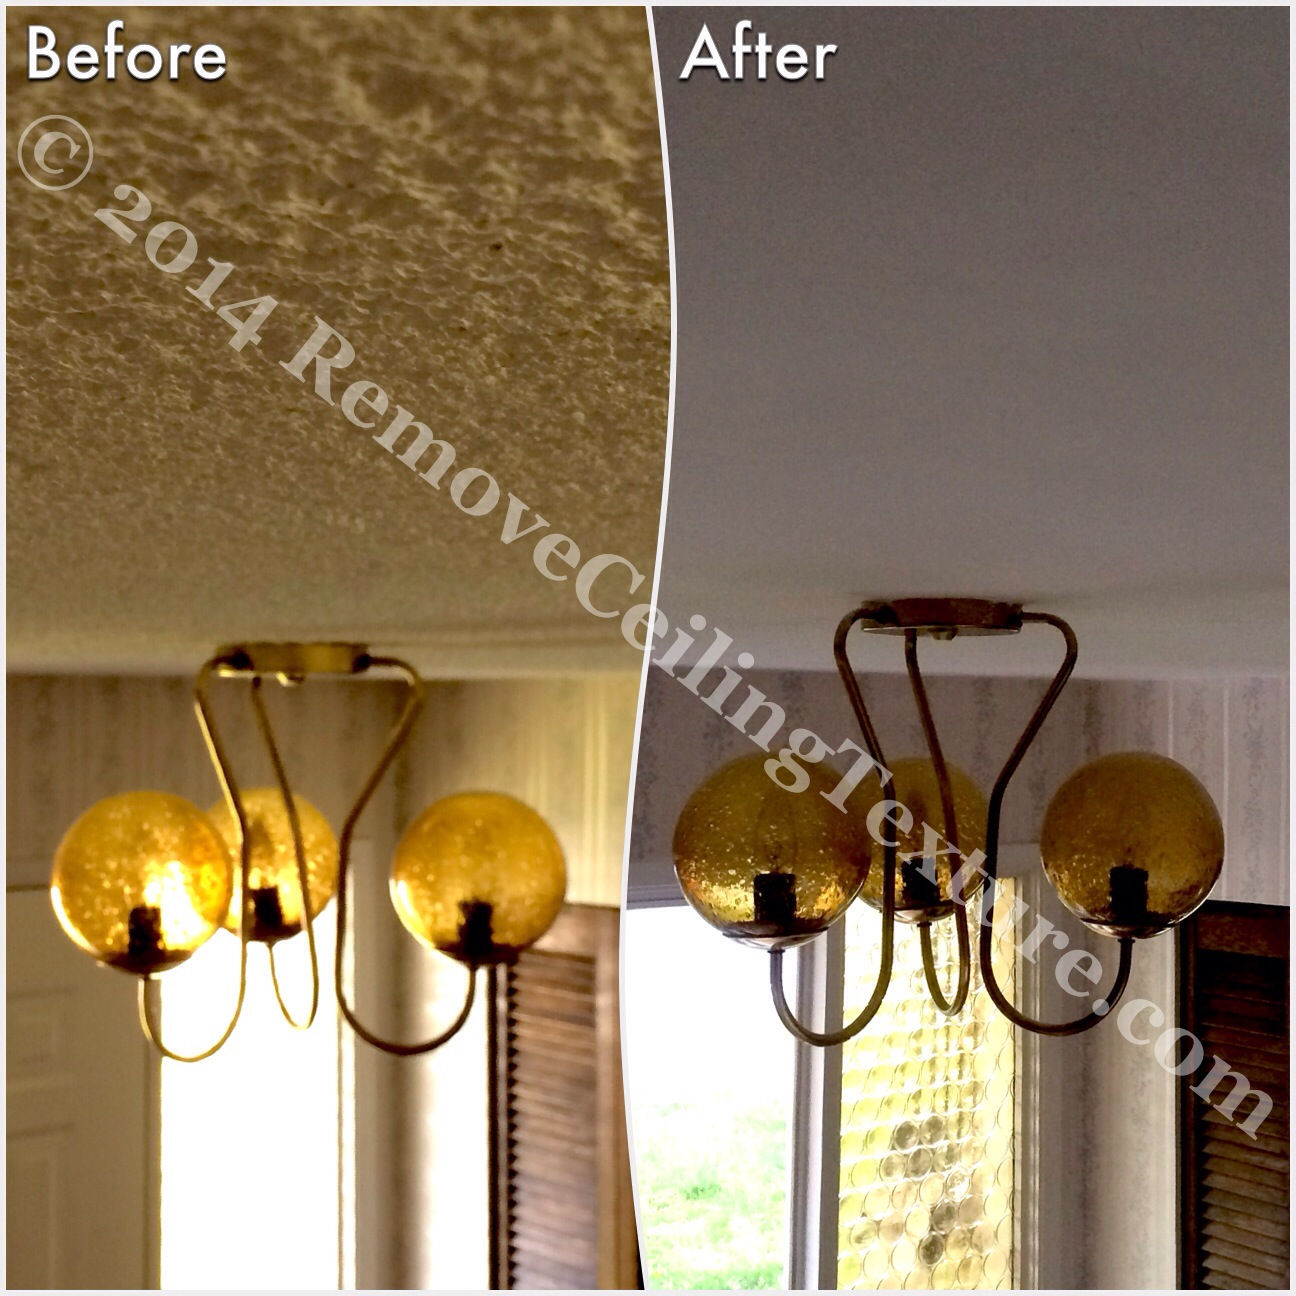
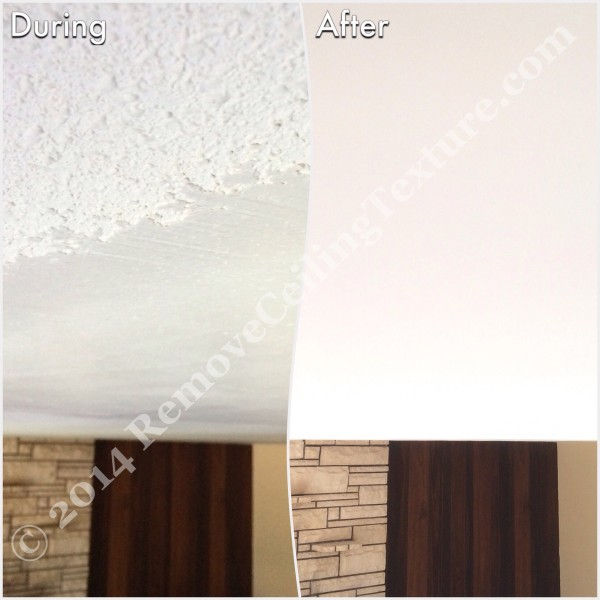
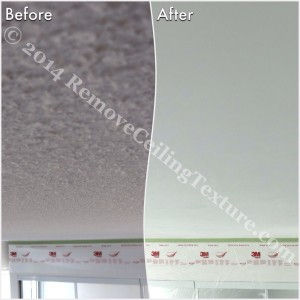
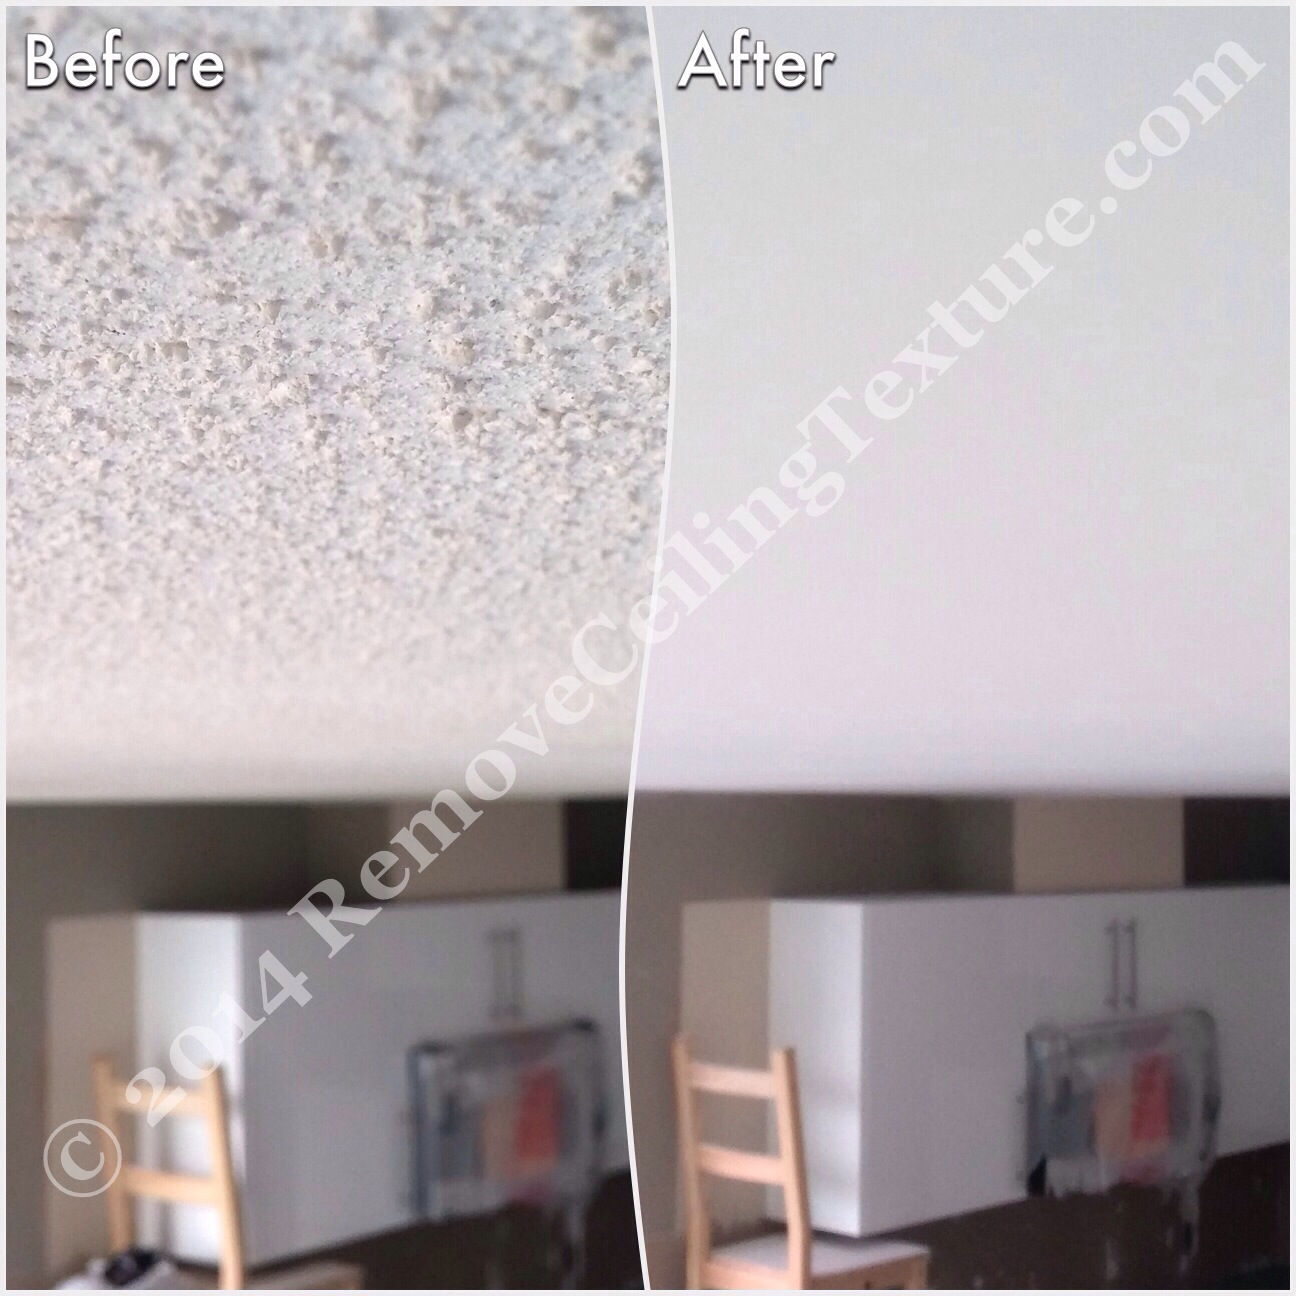
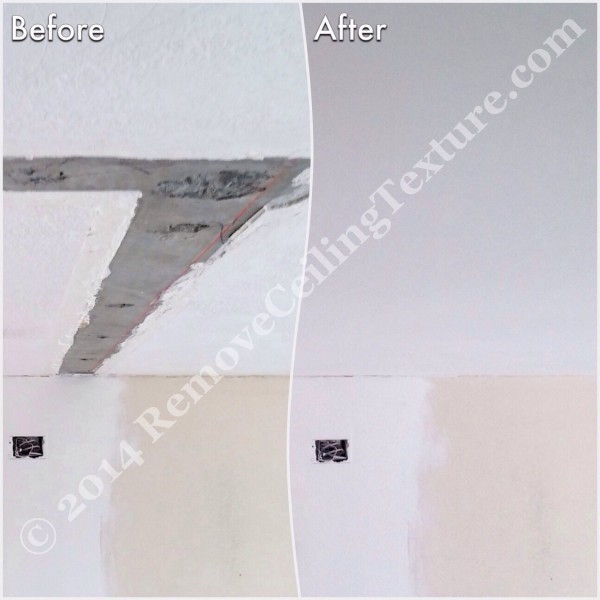
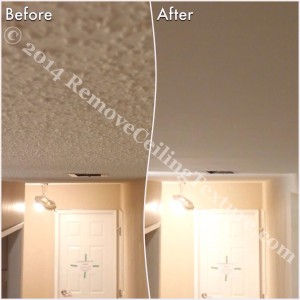
Before: Scraped ceilings are rough and ugly. After: Ceilings have been resurfaced to a smooth finish.
This scraped concrete ceiling was quite rough before RCT resurfaced it
How Does a Professional Take Scraped Concrete Ceilings & Make Them Smooth?
The key to getting a flawless, smooth ceiling is to skim coat the entire surface—at least twice. That’s right, every square inch needs to be coated. At RemoveCeilingTexture.com, we use the same method that has been used by plasterers for centuries: a hawk and trowel, and an eye for detail. Working on stilts, on a canvas above your head, takes stamina and skill. Filling-in random holes is one thing, but the real expertise comes in when a wavy ceiling needs to be levelled. This takes a keen eye, and a steady hand. Without the popcorn to hide all the imperfections on the ceiling, the finished product needs to be impeccable. Your average condo owner doesn’t have the time, patience, or skill to attain a perfectly smooth finish, and neither should they be expected to.
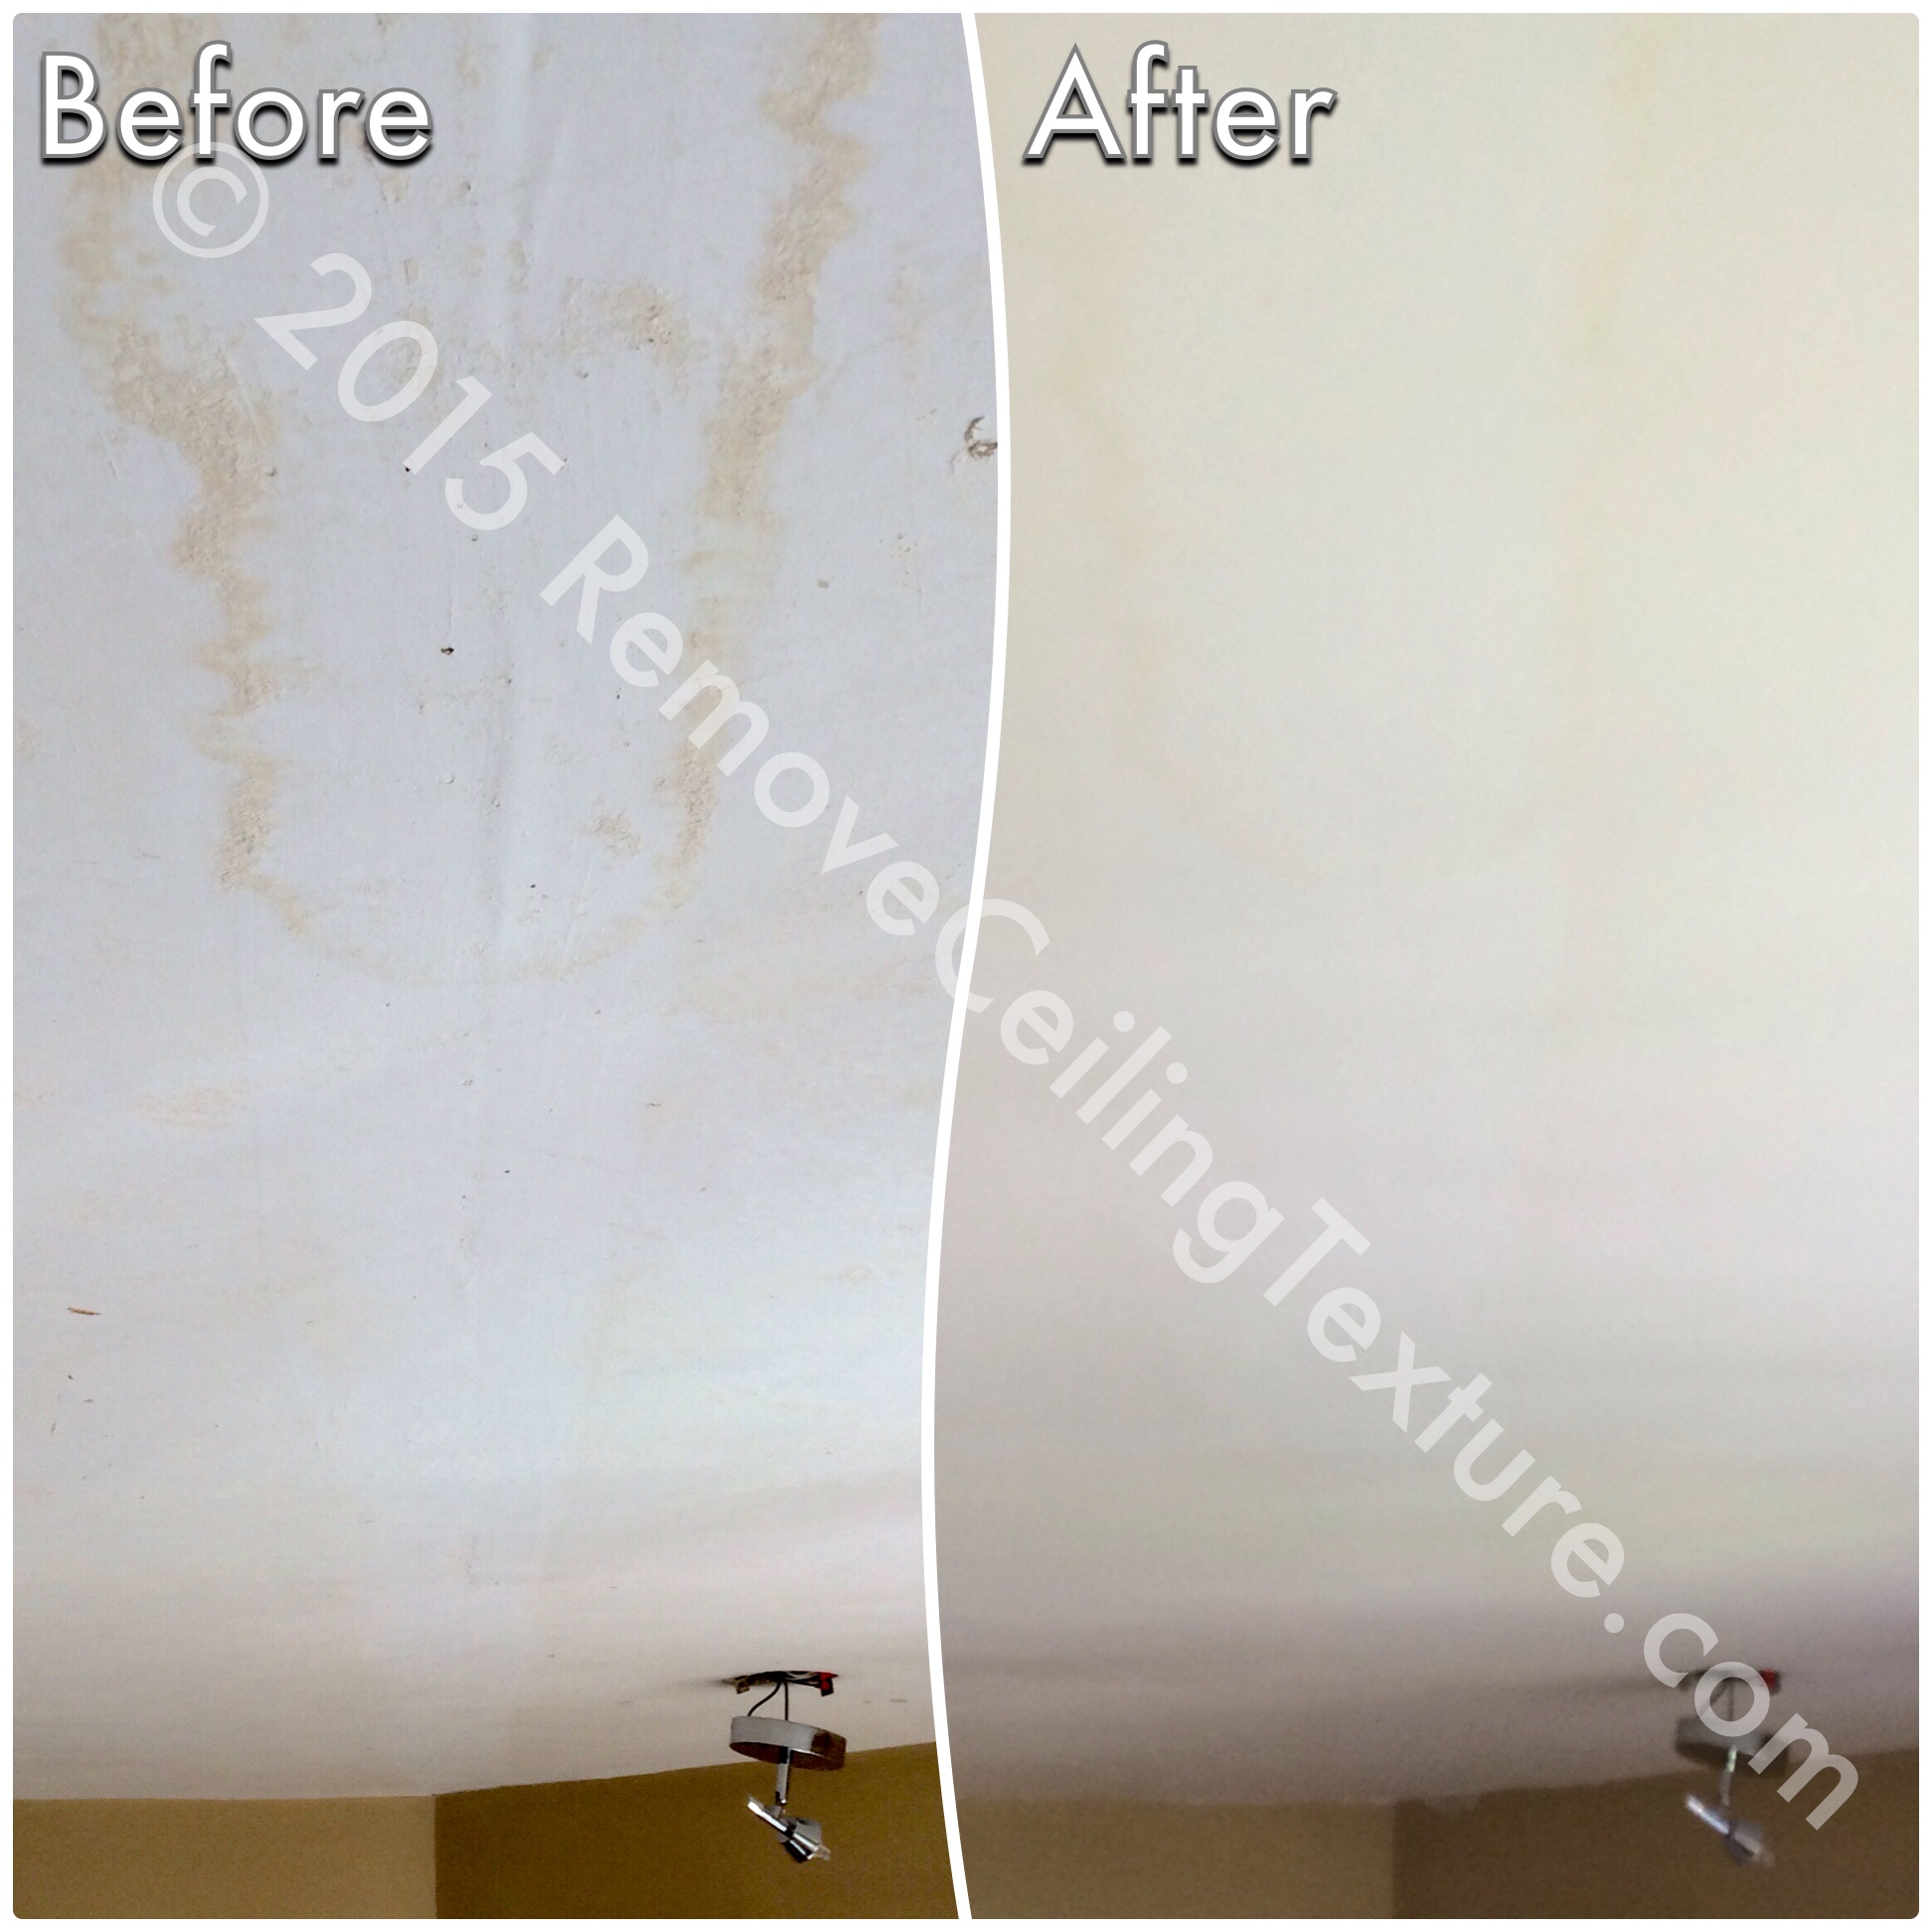
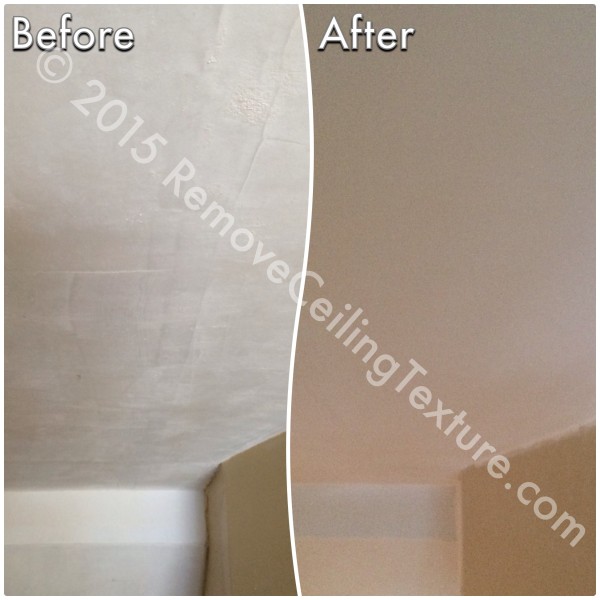
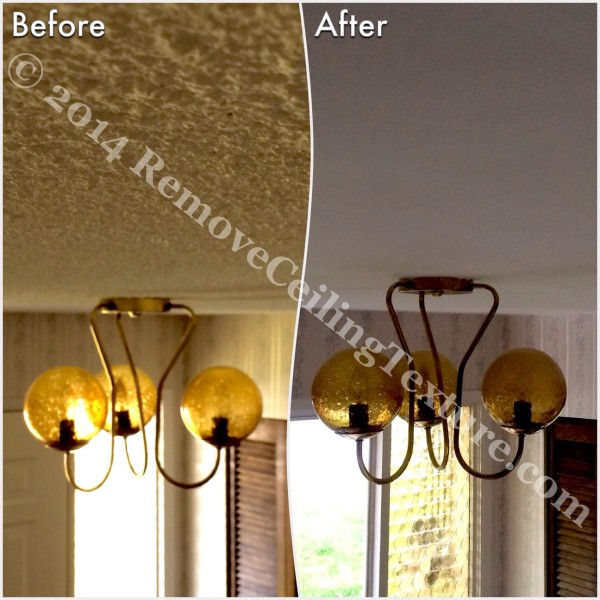
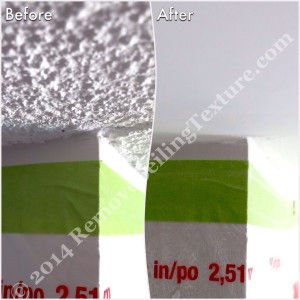
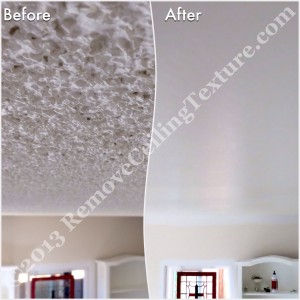
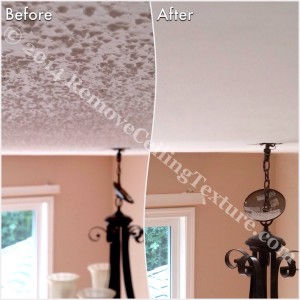
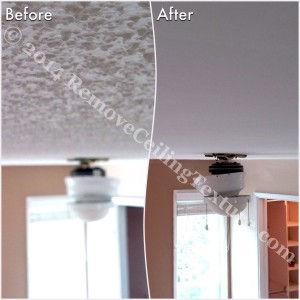
On the left, the DIY scraped concrete ceiling. On the right, the professionally finished smooth ceiling.
This was a failed DIY attempt at scraped concrete ceilings. We were called in to fix the ceilings.
There’s No Shame in Admitting You Need Professional Help!
Managing a renovation can be a full-time job. This is why a vast majority of homeowners doing renovations to their homes, choose to hire a general contractor to oversee and direct sub-trades, such as carpenters, plumbers, electricians, etc…
Hiring a general contractor isn’t always an option. You may need to research subtrades yourself.
Unfortunately, hiring a general contractor is not always an option, and it comes at a rather hefty price tag, because no general contractor will manage the sub-trades for free (nor should they be expected to). So how are you supposed to oversee your home remodel if you’re working 9-5? How can you be sure that the job will be finished on time? A renovation can be stressful enough, but if you’re the type who likes to be involved in every last detail, having a contractor work in your home while you’re away all day can be downright nerve-racking. The following tips can help you avoid feeling like you have to check on the progress ten times a day.
Before the Renovation
– Research
First and foremost, do your research. If you have family or friends who have had similar jobs done, ask them if they’re happy with the job. Ask them approximately how much it cost. They may be uncomfortable talking about the price of a renovation, but would probably give you a ballpark figure. But remember that the price is only part of the whole job.
Renovation Permits
Remember to ask them the following questions:
– How long did the project take? Was it within the time frame promised?
– Was the final price different from the quote given? If so, why?
– Was the contractor respectful and did he/she communicate well with you?
– Were your questions about the project answered in a satisfactory manner?
– Did the contractor have references?
– Did the contractor do a basic clean-up afterwards?
– If permits were required for the renovation, was this taken care of prior to starting the work?
– Would you hire the contractor again?
– What would you do differently if you had to do it again?
– Get estimates
Get estimates for your renovation
Unless you already know what it costs for your project, which is unlikely unless you’re in the industry (in which case you’d probably do the job yourself!), you’ll need a few estimates to find this out. Try to get at least three estimates. This is usually enough to tell you whether the job will cost $1000 or $10,000. You want to be able to compare the estimates properly, so make sure each one covers the same scope of work. Remember that cheapest price is not always the best deal. There may be a reason why they charge so little. Perhaps they cut corners or don’t pay their workers very well. Even worse, in the majority of cases, the cheapest contractor upfront, will end up nickel-and-diming you for every single little thing that should have already been included in the scope of work to begin with.
– Get references
Call Potential Contractors’ References
References are a must. Be wary of companies that can’t provide any. And make sure you actually contact the references. Ask them the questions listed above under Research. It is best to have references from the contractors’ recent jobs. The older a reference, the less valuable it is.
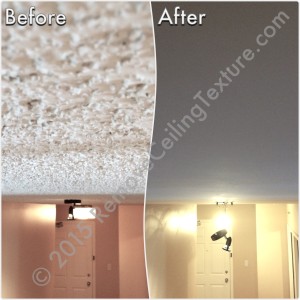
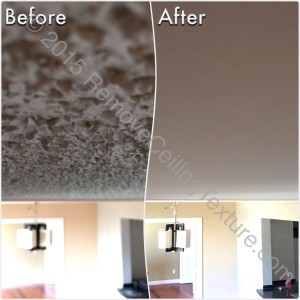
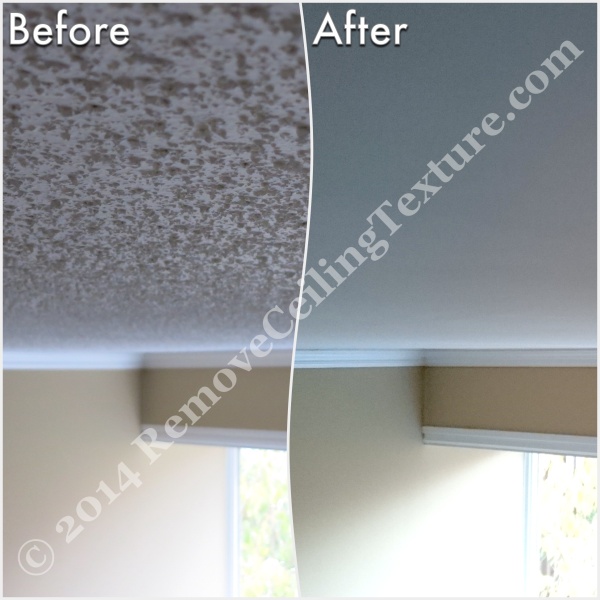
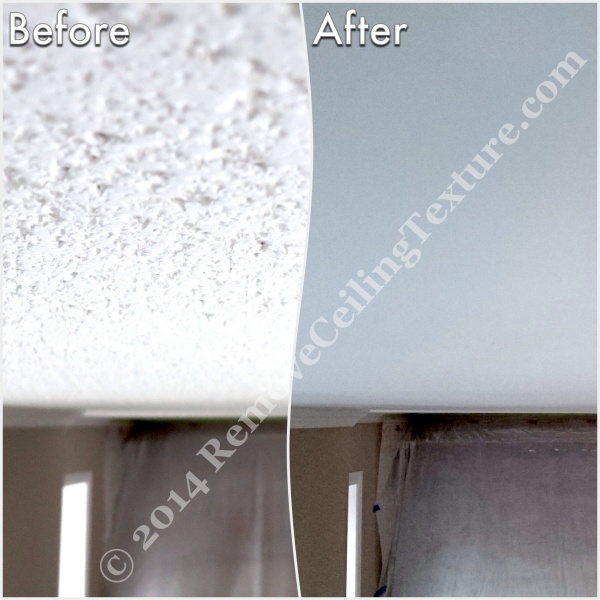
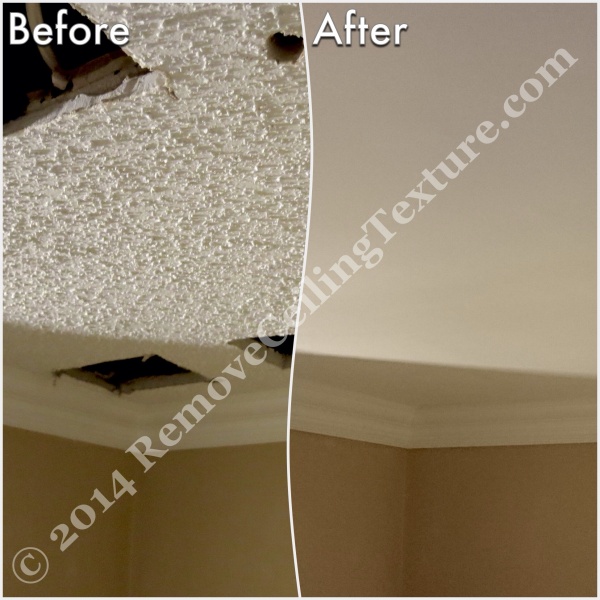
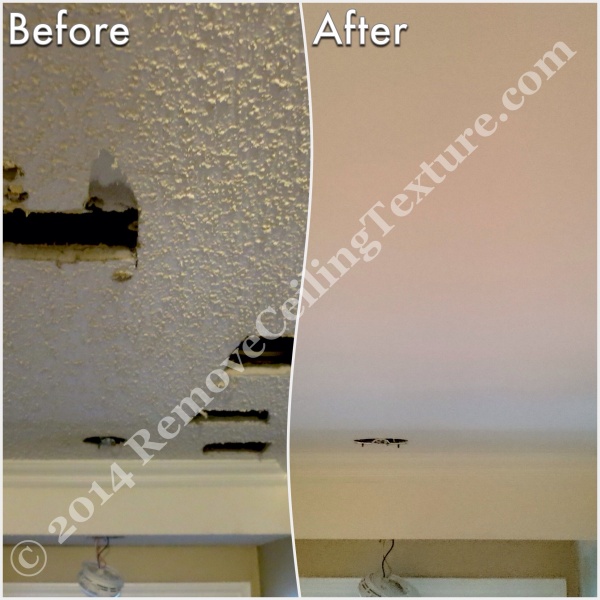
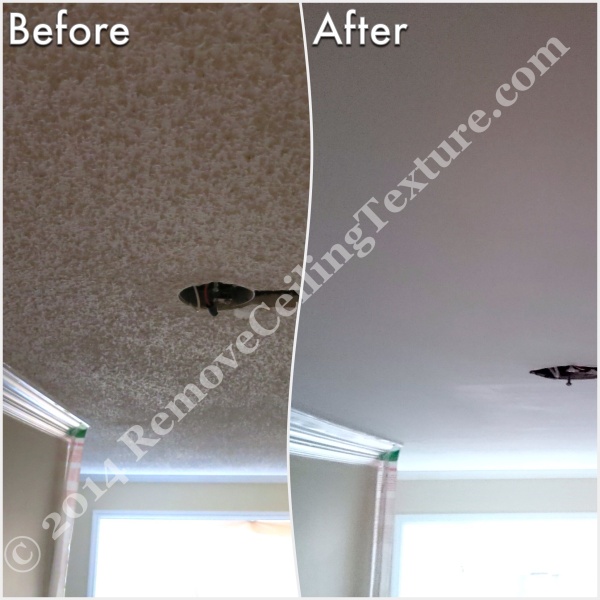
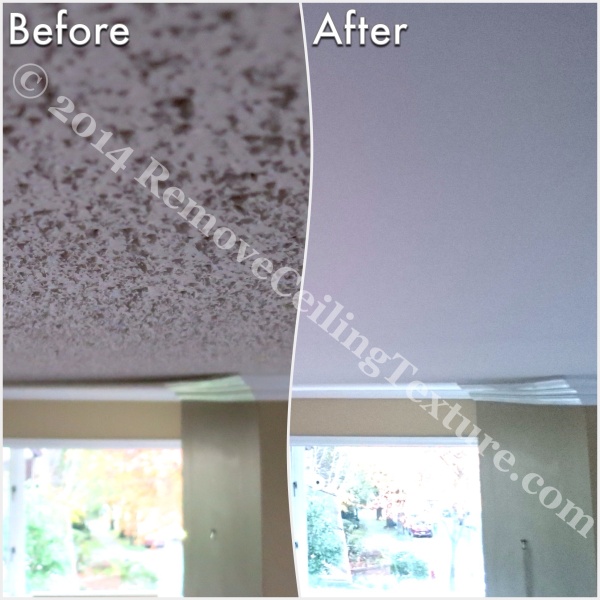
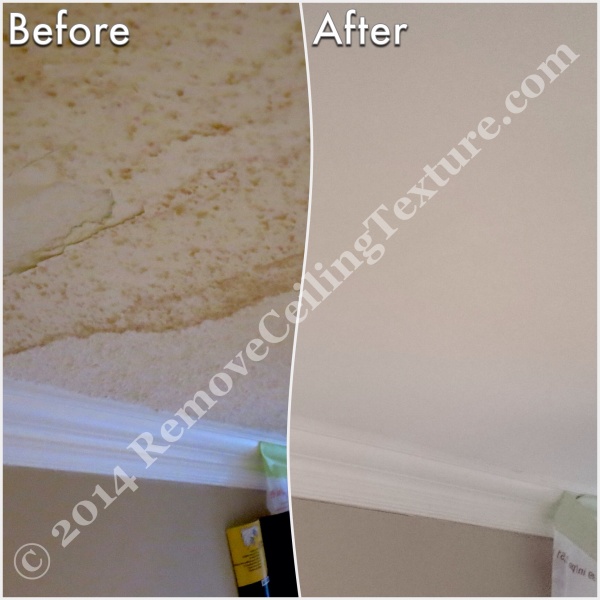
Also ask if they have any examples of their work, either to view in person, or photos in photos. Before and after photos are especially good as you can see exactly what was done.
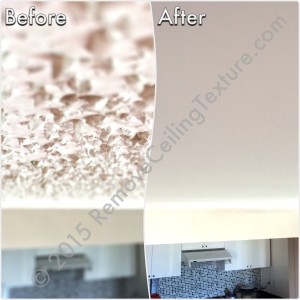
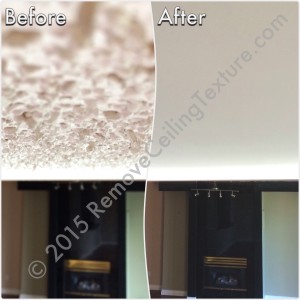
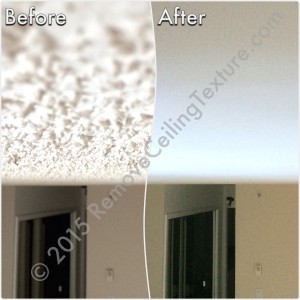
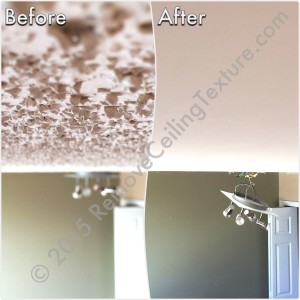
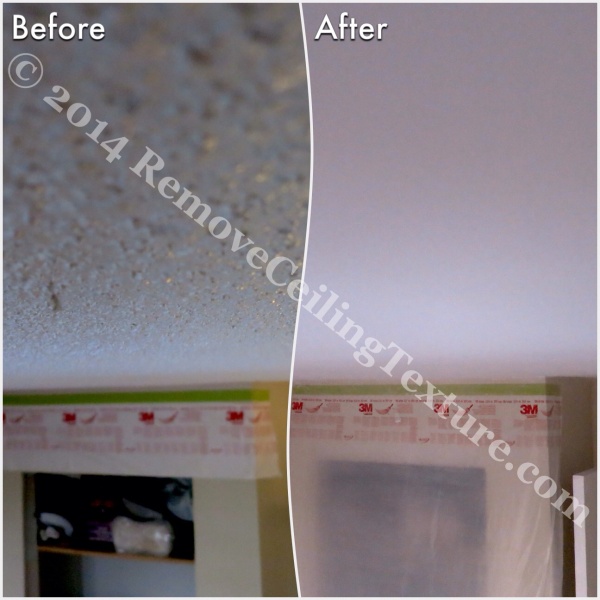
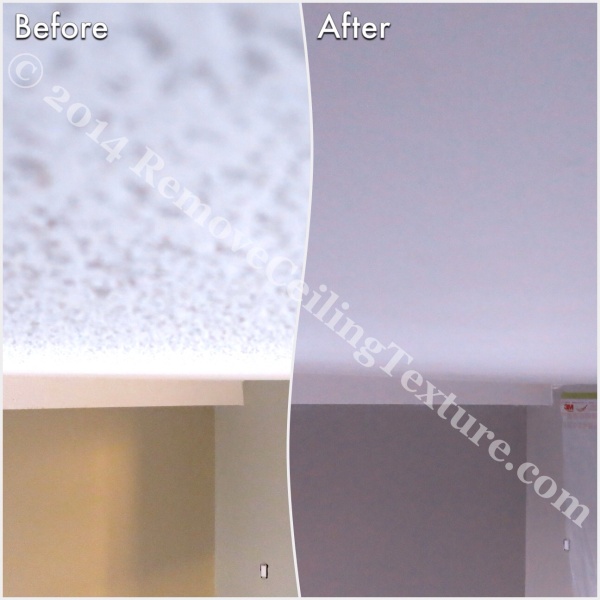
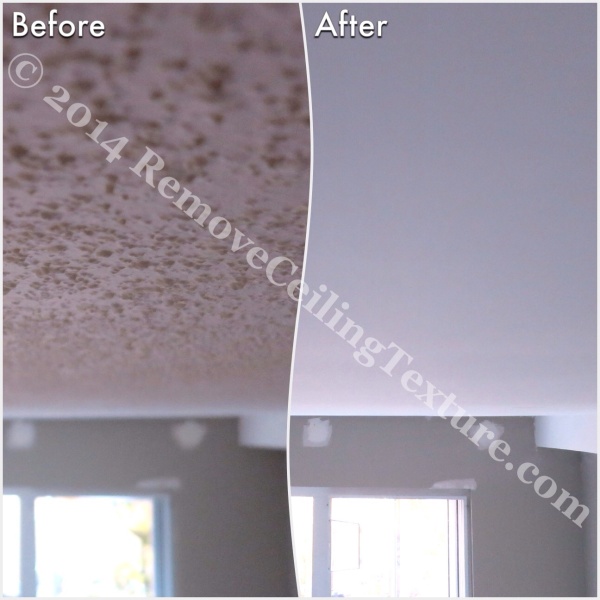
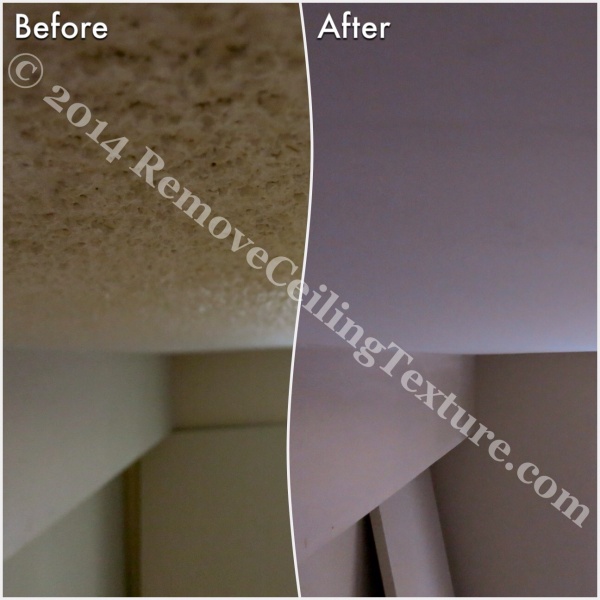
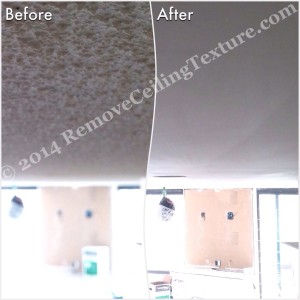
Before & After Renovations: Ceiling texture removal at a condo at 1188 Quebec St (Kitchen)Before & After: Ceiling texture removal at a condo at 1188 Quebec St (Living Room)Before & After Renovations: Ceiling texture removal at a condo at 1188 Quebec St (Master Bedroom)Before & After Renovations: Ceiling texture removal at a condo at 1188 Quebec St (Den)
– Get a written quote
Once you’ve decided on the company you’ll be using, make sure they give you a formal, written quote. This doesn’t necessarily need to be written on paper, but it should at least be sent to you by email, instead of just relying on a verbal quote. Most contractors are not out to take advantage of you, or try to get away with anything questionable, however, it’s worth it to protect yourself. You can’t go back to prove that a certain verbal quote was given.
– Read the fine print
Make sure to read any fine print in the renovation quote
Go over the quote carefully. Read all the fine print. Make sure everything you have discussed with the contractor is included. If you have any questions or concerns, or if any details are unclear, make sure to bring it up before work has begun. This can avoid miscommunication problems and disagreements later.
– Be aware of any warranties
If the quote doesn’t explicitly say anything about warranties, make sure to ask. Ask what is covered under the warranty, and how long the warranty is for. Of course, a warranty is no good if the contractor that you hire goes out of business 3 months after your remodeling project has ended. So pick a contractor with a long track record.
– Discuss a timeline with your contractor
Ask your contractor for an idea of the timeline of your renovation
No matter how well you plan it, construction involves unforeseen complications. Always, always, always give your renovation project more time than you are told it will take.
Ask for a timeline for the project. Of course, unexpected things can happen during a renovation that will delay or cause the project to take longer than possible, but for the most part, you should have a good idea of the end date and any important milestones along the way. If something does come up, a reputable contractor will let you know and will be honest about the change in timeline. For instance, if it’s a bathroom renovation, and there is unexpected, dangerous mold found inside a wall, there may be some extra time involved, and potentially extra cost, if it was not part of the expected renovation. The contractor should contact you to get your consent before going ahead with anything that was not included in the quote.
– Ask about any prep-work that you’ll need to do before the renovation starts
Before the agreed upon start date, ask if there’s anything you need to do before the contractor gets there to start. Most renovations require furniture to be moved and/or covered, some will require light fixtures to be taken down, it will just depend on the type of renovation you’re having done. Many contractors will take a spare key so that they have access in and out when you are not there. This is a good idea, especially if you have a door that requires a key to lock it. If the contractor goes for lunch, or goes to pick up supplies, they need to be able to secure your home. This also means that if you’re not living there, you don’t have to worry about getting there each morning to let them in.
– Leave a deposit
Your contractor will likely ask for a deposit. This can be anywhere from 10% to 50% of the total. Deposits are taken for several reasons. Contractors need to make sure that their clients are serious about having the work done. If they book a renovation, and at the last minute the client gets cold feet and backs out, the contractor may have a hard time finding another job to replace it. There are, of course, legitimate reasons why a client may have to cancel, even at the last minute. The scenario above is just referring to clients that weren’t really serious in the first place, or didn’t have the money to pay for the renovation. Leaving a deposit is a sign of good faith on the part of the client. They will be less likely to cancel for insignificant reasons if they have “skin in the game”. Another reason for the deposit is for materials. The contractor will need to buy supplies and materials for your renovation.
During the Renovation
– Initial walk-through
If it’s been awhile since the contractor has seen your home or the worksite, it’s a good idea to meet them there on the first day and do a walk through to make sure you’re both on the same page. If you have any last-minute instructions, or if there are idiosyncrasies about the house that they should know about, let them know now. For instance, if you have a cat that stays in a bedroom and should not be let out, let them know. You can give the contractor a set of spare keys at this time so that they can come and go.
– Progress reports
While it’s tempting to call multiple times a day to check on the progress, these phone calls will only stop the contractor from doing what they’re supposed to be doing: finishing your renovation. If you’ve done your due diligence and talked to references, you should be confident that your contractor knows what they’re doing and is competent to finish the project in the agreed upon timeline. If you’d like to stay involved (and it’s a very good idea to do that), ask them to give you an update at the end of each day, either verbally or a written account. That way you know what’s going on with the project, but you’re not disrupting their work all day long. That being said, if you do have actual questions or concerns, don’t hesitate to call them at anytime.
After the Renovation
– Final walk-through
When the project is complete, make sure you do a walk-through with the contractor. If you’ve been in contact with the contractor throughout the job, there should be no surprises. This is the time to make sure you’re happy with the final project. If there are deficiencies, or areas that need to be touched up, say so. It’s far better to speak up now, rather than to give your okay and then later try to claim that you were unhappy with the job.
– Final payment
Once you’ve done the walk-through with your contractor, final payment will be due. Many companies will have a clause in their contract or quote that says payment is due immediately upon completion, and some will not accept cheques via mail.
– Clean-up
Most contractors will do a general clean-up, but you’ll likely be responsible for fine cleaning. After all, you’ve hired a renovation contractor, not a cleaning company.
– Reviews/Testimonials
If you’re happy with the work the contractor has done, they would appreciate a review on any social media network they’re on, such as Yelp or Facebook. If you’re not happy, before posting a negative review, consider contacting the company with your concerns. A reputable contractor will most likely work with you to make sure you’re happy. It’s worth it for them to make sure they have happy customers, for reputation, repeat business, and potential referrals.
– Referrals
If you know someone having the same type of project done, give them the name and number of any contractors you’ve dealt with that you were happy with. This will save your friends from hiring a company blindly, and will help the contractor, too. Some companies will even send some sort of thank you.
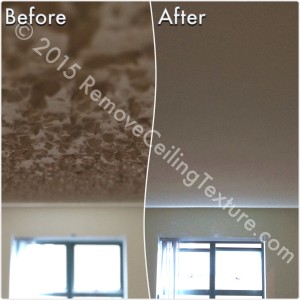
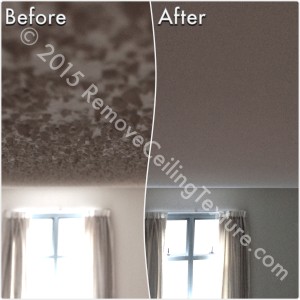
Before & After Renovations: Ceiling texture removal at a condo at 1188 Quebec St (Entrance)Before & After Renovations: Ceiling texture removal at a condo at 1188 Quebec St (Dining Room)Before & After Renovations: Ceiling texture removal at a condo at 1188 Quebec St (Bedroom)Before & After Renovations: Ceiling texture removal at a condo at 1188 Quebec St (Bedroom)
Doing renovations? Start from the top by having your popcorn ceilings removed!
As experts in the ceiling industry, at RemoveCeilingTexture.com, we get asked a lot of questions about ceilings. Here is a Frequently Asked Questions section to help you with anything you’ve been wondering about ceilings and ceiling texture. If there is a topic or question that we haven’t covered, please contact us and we’ll be happy to answer your question.
Ceiling Texture Terminology
Let’s start by looking at some terminology. You may hear popcorn ceilings referred to as stippled ceilings, textured ceilings, knockdown texture, Spanish texture, cottage cheese ceilings or stucco ceilings. All those terms refer to some form of ceiling texture.
FAQ About Asbestos in Ceilings:
1. Is there asbestos in ceiling texture?
Not all ceiling texture has asbestos. Domestic sales of asbestos-containing products were banned in 1978, but any existing stock was allowed to be used. A home built in 1982 or prior could have asbestos in the texture. The only way to tell for sure is to take a sample to a certified lab that does asbestos testing. We recommend taking separate samples if you have different types of texture sprayed on your ceilings. Bring the samples to a certified laboratory in your locality, who does asbestos testing.
It is very important to remember that you deal with a laboratory who does not also provide asbestos abatement services. There are many asbestos abatement contractors who operate asbestos testing labs. Such contractors have a vested interest in reporting positive asbestos results, and scaring the customer into buying their asbestos abatement services. We regularly use and recommend HBM Environmental Laboratories in the greater Vancouver area, because they have a proven and reliable track record.
2. Is it safe to live in a home that has asbestos in the ceilings?
If there is asbestos in your ceiling texture or drywall mud, it is generally not a problem unless you start disturbing it. Asbestos fibres are not dangerous unless they become airborne and can then be breathed in. If you are planning renovations, make sure that you take a sample to a lab for testing, or hire a company that will take a sample for you. At RemoveCeilingTexture.com, we offer a service where we will collect the sample from your property and have it tested by a certified laboratory. Contact us today to get your ceiling texture, drywall mud or linoleum floor tiles tested for asbestos presence.
Ceiling Texture Removal at 1st Ave Vancouver – Bedroom
3. How can I tell if my ceiling texture has asbestos?
Asbestos fibres are microscopic, so the only way to tell if your ceiling texture has asbestos is to have a sample tested at a certified lab. Even if your home was built prior to the asbestos ban (1978), it’s not guaranteed that the ceiling texture contains asbestos.
4. When was asbestos banned in popcorn ceilings?
Canada banned the use of asbestos in popcorn ceiling texture in 1978. However, they allowed any existing stock to be used up. A home built prior to 1982 should have the texture tested if renovations are planned, just to be on the safe side.
Ceiling Texture Removal at 1st Ave Vancouver – Dining Room
5. Is there asbestos in drywall?
Drywall itself does not contain asbestos. However, prior to the asbestos ban in 1978, asbestos was routinely added to the mud that drywallers used to tape drywall joints. If you’re planning renovations, be sure to take a sample of the joint tape and mud to your local certified asbestos testing lab.
6. I scraped my popcorn ceiling and it contained asbestos. Should I be concerned?
Asbestos fibres are so tiny that even a paper mask will not protect you from breathing them in. Only a proper respirator is acceptable. If you used a paper mask, or no protection at all, while you were working and there was asbestos involved, you should be monitoring your lung health. Because asbestos fibres are miniscule and jagged, when they are breathed in, they can become lodged in the lung tissue. Repeated exposure (such as to people who work in the asbestos industry), is most dangerous and can lead to scar tissue and mesothelioma, a type of lung cancer. Scientific observations have also shown that a smoking habit greatly increases the risk of lung cancer in conjunction with exposure to asbestos. Often there are no symptoms until many years after exposure, so make sure to get anything unusual checked out by a qualified medical professional.
Ceiling Texture Removal at 1st Ave Vancouver – Entrance
7. Is it illegal to paint popcorn ceilings that contain asbestos?
No, it is not. All forms of textured ceilings, including ones containing asbestos are being painted every day in the Greater Vancouver area.
8. Should a home inspector remove a part of a textured ceiling to determine if there is asbestos?
As it is routinely the case, home inspectors come in prior to the sale/purchase transaction of a property. Therefore it is not customary for home inspectors to alter or remove any part of the house. If you are selling your home and you are aware of any part of your house containing asbestos, you are obligated by law in Canada and the United States, to disclose that your home contains asbestos.
If you are purchasing a home, your seller must disclose if they know any part of the home contains asbestos.
Ceiling Texture Removal at 1st Ave Vancouver – Hallway
9. Where can I go to get popcorn ceiling tested for asbestos?
As mentioned above, you are best off finding a certified local laboratory who performs asbestos testing. We use the services of HBM Environmental Laboratories in the greater Vancouver area.
FAQ About the Ceiling Texture Removal Process
10. How many days do we have to be away from home when having popcorn ceilings removed?
While it’s not necessary to move out while your ceilings are being worked on, if you do have a place to stay, that will make it easier for everyone. The number of days required for the project will depend on several factors: the size of your home, the height of the ceilings, if there are vaulted areas, skylights, if there is asbestos involved, etc., but in general, it will take 5-7 days for an average sized condo or home. If you’re also getting your ceilings painted, add another day or two.
Ceiling Texture Removal at 1st Ave Vancouver – Hallway
11. What is the process that RemoveCeilingTexture.com uses for smoothing ceilings?
Before beginning, we must find out if there is asbestos in the ceiling texture. If your home was built in 1982 or prior, there’s a possibility that there is asbestos present. Since asbestos fibres are microscopic, the only way to know for sure is to take a sample to a lab to be tested.
If there is no asbestos present, the first step is to remove the ceiling texture. Most DIY sites tell you that you have to spray the texture with water and then take a little scraper and physically scrape every inch of texture off. This DIY process is wet, messy, and very time consuming, and if your ceiling texture has been painted, there is no guarantee that the texture will come off with water. As professionals in the ceiling industry, we have the tools needed to take off the texture in a fraction of the time, with no water and far less mess. We use a special German-engineered Festool machine to sand the texture down. It vacuums as it sands, so the texture falling to the floor is minimal.
If there is asbestos present, we skip the step above and start with the following step.
The next step is the most important part in getting smooth, finished ceilings. Using the same method that plasterers have used for centuries, the hawk and trowel, we apply a mud compound to the entire ceiling. This requires working on stilts, using an artist’s eye to overcome any deficiencies in the ceiling. This generally takes two to three coats of compound to ensure the ceiling is flat and as level as possible.
The final step is a light sanding to make certain the finish is smooth. We then vacuum up the majority of the dust and the project is complete. We can also provide ceiling paint, if required.
12. How much does it cost to have popcorn ceilings removed?
There are many factors to determining the cost of ceiling texture removal. Some considerations are the age of the home, height of the ceilings, vaulted areas, skylights, etc. Be wary of someone who gives you a firm price sight-unseen. At RemoveCeilingTexture.com, we can often give you a rough estimate of the price without seeing the ceilings, but in order for us to give you a firm, formal quote, we need to come out to see the ceilings and take some measurements.
Ceiling Texture Removal at 1st Ave Vancouver – Hallway
13. Is the process of ceiling texture removal really messy?
If you’re scraping your own popcorn ceilings, then yes, it’s very messy. At RemoveCeilingTexture.com, we have the professional tools and the experience necessary to transform ceilings from lumpy to smooth with minimal mess. That being said, it is a renovation, and like any renovation, there will be dust involved. We do our best to keep your home clean, and vacuum up the majority of the dust. As with any construction/renovation project, a thorough cleaning is the homeowner’s responsibility.
14. I’m having my ceiling texture removed. What do I need to do to prepare?
All areas of the ceilings must be accessible. Move as much furniture as possible out of the rooms that will be worked on. Any furniture that cannot be removed should be pushed up against the walls. Sofas and beds can be tipped up on their sides and leaned against the walls. Cover anything that you don’t want to get dusty with plastic or sheets.
It’s not necessary to protect your floors, as the texture and dust is vacuumed up, and the mud compound used to resurface the ceiling is water-soluble. However, if you prefer to protect your hardwood or laminate floors, use a sturdy paper product like this one, also available Home Depot, not plastic, as that will make the floor too slippery to walk on with stilts. If you are protecting carpet, use a product such as this self-adhering film from Home Depot.
Access to water and electricity is required. A sink and normal household outlets will work.
Ceiling Texture Removal at 1st Ave Vancouver – Living Room
15. Does RemoveCeilingTexture.com carry insurance and WCB coverage?
Yes, RCT is fully covered by insurance and we have WCB coverage. Information about each is sent out with our formal quotes.
General Ceiling Questions
16. Does popcorn ceiling lower the value of your home?
We’ve dealt with many buyers who are in the process of putting an offer on a home. They contact us to see how much it will cost to have the ceiling texture removed, and they’re going to factor that into the offer. If your ceilings are already smooth, your home will naturally fetch better offers from potential buyers. If the choice for a buyer is between your home and a similar home, you want to get whatever edge you can. If one has modern, smooth ceilings and is move-in ready, it will be more appealing.
Ceiling Texture Removal at 1st Ave Vancouver – Living Room
17. Why are builders still applying ceiling texture?
Spraying ceilings with texture remains a popular choice with builders because it’s faster, and therefore cheaper, than spending the time on finishing them properly. This is especially true for condos. There are so many units to be finished and there’s usually a tight schedule in order to keep the profit margin as high as possible.
18. Can I just I drywall over my textured ceilings?
Drywalling over textured ceilings is not a very good way to get smooth ceilings. First of all, you’ll lose at least 1/2″ of headroom. You’ll also be adding a lot of extra weight to the ceiling joists. Why add that extra weight when it’s unnecessary? RemoveCeilingTexture.com’s process of smoothing ceilings does not add the heavy bulk that drywall adds.
Ceiling Texture Removal at 1st Ave Vancouver – Living Room
19. Do popcorn ceilings cause allergies and asthma?
While popcorn ceilings may not actually cause allergies, they can aggravate them. Airborne dust tends to get trapped in popcorn ceilings. It’s next to impossible to clean textured ceilings without creating a huge mess, so this dust builds up. It often floats back down and can irritate anyone’s breathing, let alone someone with a compromised respiratory system. Smooth ceilings don’t trap dust like popcorn ceilings do, and they’re easy to clean, if necessary.
20. What’s causing the cracks in my ceiling?
There are several reasons your ceilings could be cracking. If there’s a leak in your roof, or from your upstairs neighbour, the water that trickles down to your ceilings can cause cracks and can make your popcorn texture peel. The first thing to do is to get the leak fixed. This will most likely involve a plumber. Fixing the ceiling without fixing the leak is just throwing away money. The ceiling damage will keep coming back until the root of the problem has been addressed. Once the leak has been fixed, you can think about having a professional fix your ceilings. This is often the perfect to opportunity to also have the popcorn texture removed.
Cracks can also appear due to the natural settling process of buildings, or if your home was built on improper footings, or on clay soil.
Cracks often appear around the edges of popcorn ceilings, where the wall meets the ceiling. This is often caused by improper finishing of the drywall tape at the wall/ceiling joint.
The important thing to remember with cracks is to fix the root problem first, if possible, then have a ceiling professional fix the ceilings.
There are so many options for ceilings besides lumpy popcorn texture! Most of these suggestions require your ceilings to be smooth first, so a good first step is ceiling texture removal.
Wallpaper: Wallpaper is making a comeback, and a growing trend is to use it on ceilings.
Metallic leaf: If you have a large budget and want something really unique and luxurious, you can have your ceilings gilded in silver, gold or other metallic leaf.
Coffered ceilings: Coffered ceilings are most often seen in custom-built homes and can project a unique and exclusive feel.
Wood: Wood can be used in various ways on ceilings. Wood beams can create a European or Mediterranean atmosphere. Or go for a cabin or cottage-type look by using tongue and groove wood paneling. The company Stikwood offers an easy way to get the wood look: stick-on wood.
Bright, unexpected colours: A quick and inexpensive way to change your ceiling is to simply paint it an unexpected colour.
Have a question about your ceilings? Ask the professionals at RemoveCeilingTexture.com!
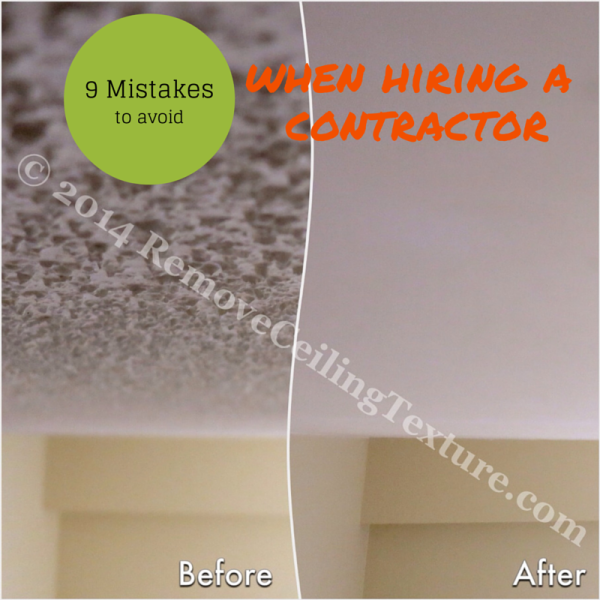
Hiring a home improvement professional is one of those hurdles of home ownership, that nobody wakes up in the morning wanting to volunteer for. There are many considerations to keep in mind when you are looking to hire a contractor. How is the contractor’s reputation in the marketplace? Will I get overcharged? Will the finished job be on par with market standards? Will there be a warranty policy in place? Are my children and household going to be safe when this contractor walks into my house?
You can see that the selection process of choosing a contractor can become overwhelming really quickly. There are many different service provider review sources on the internet, that will provide nominal feedback about your potential contractor. Sites such as Yelp, HomeStars, Angie’s List and other similar portals, are a good place to start when you want to get a general idea of what your potential home improvement contractor looks like.
But beyond scanning these social review portals, as a homeowner, you should be doing your own research into every contractor that you want to hire for your home. In this article, we tackle 9 of the most common oversights homeowners commit, when hiring a contractor.
1. Hiring a Family Member or Friend
While it’s great to help out family and friends, hiring them for contracting work can turn into a tricky situation. If the person is actually qualified to do the work, then by all means hire them. However, if they say something like, “Yeah, I could probably do that for you”, or “Why hire someone when I’ll do it for a case of beer?”, you should probably steer clear. There are a couple of ways that this situation can turn ugly. Sometimes a family member or friend can be less motivated than a hired professional. Showing up late (or not at all), or taking frequent breaks can sometimes occur. The rationale is that, because you are friends or family, you’ll be okay with them missing a couple days of work so that they can party in Vegas. What should have been a 5-day job can easily turn into weeks or months.
The second way this can backfire is if they do a terrible job and you hate it. It can be difficult to say to a loved one, “This sucks. Really, it’s hideous”. You’ll mostly likely have to pay a professional to fix the atrocious blunder. And you’ll likely feel like you have to avoid your friend or family member at all future functions. You can only hide behind a Christmas tree for so long.
2. Hiring a Contractor Who is Not Experienced with the Type of Project that You’re Planning
“I have a great plumber. I’m thinking about hiring him to do my electrical work. Water and electricity go together, right?”
Of course, it’s ridiculously obvious that this is a terrible idea (if this is not ridiculously obvious to you, the fact that you’ve made it this far in life is pretty admirable). But sometimes it’s less obvious. Some contractors are good at what they do, but if they’re not that familiar with your type of project, it could turn into a learning experience. At RemoveCeilingTexture.com, we often see the results of this. We’ve had clients who have hired a contractor, or sometimes a “handyman”, to take off their ceiling texture. We end up getting called to fix the ceilings because, either the contractor realized he was not able to do the job properly and bailed, or the end result was rough, patchy or wavy ceilings. Hiring the right professional from the start can save you time and money.
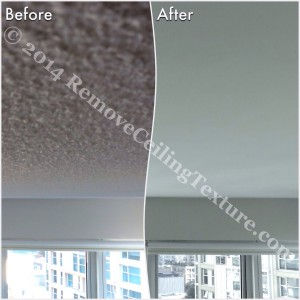
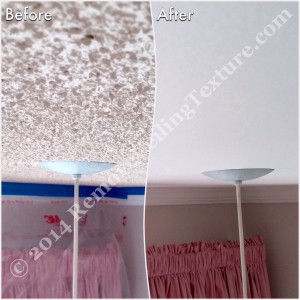
Before and after of ceiling texture removal at a condo at 621 East 6th Ave, Vancouver – Bedroom (1)
3. Not Getting More Than One Quote
Unless you’re in the industry, you probably don’t really know what it costs to build a wall, tile a bathroom or install new flooring. By getting more than one quote, you’ll be able to get an idea of the industry standard. It will also help weed out some of the questionable contractors. If you’ve received a few quotes that are within the $2000 – $2700 range, and one comes in at $16,000, there could be something fishy going on. Or, they may have misunderstood the scope of the project (see below re: making sure what’s included in the quote).
4. Not Making Sure What’s Included in the Quote
This is important for two reasons. You want to make sure that when you get a quote, the materials and the labour are included in the price. If halfway through the project, the contractor comes to you for more money for something that really should have been included in the total, that’s pretty shady. Your contractor should state clearly what is included in the quote. If he/she doesn’t, ask them to clarify. A reputable contractor will be upfront regarding the costs.
The other reason to find out what’s included is so you can properly compare quotes from different companies. You want to make sure you’re comparing apples to apples, not apples to orangutans.
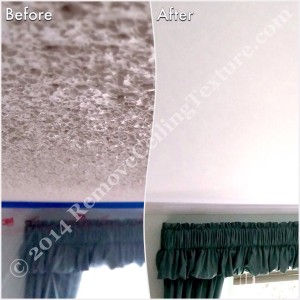
Before and after of ceiling texture removal at a condo at 621 East 6th Ave, Vancouver – Bedroom (2)
5. Not Asking For References
If a contractor is unwilling to give you any references, that’s a red flag. What we’ve found with removing ceiling texture, is that our clients are so happy with their smooth ceilings that most of them are more than happy to be references and talk to potential clients. Some of them even volunteer to have our potential client come and view their ceilings. If a contractor doesn’t have any happy clients, find someone who does.
6. Going With the Lowest Quote Because it’s the Cheapest Price
The lowest quote doesn’t always translate into the cheapest price for the project. Sometimes a contractor who gives a very low price is not being truthful about the actual price, just so they can get the job (see point 4 above). The final invoice at the end of the project can be a bit of a shock when this happens (“What’s this extra charge for?” “Oh, that’s for drywall screws”).
Or maybe the contractor can get away with this low price because they cut corners. When this happens, you often end up having to hire someone to fix the job afterwards. It’s worth spending a little bit more to get quality results the first time.
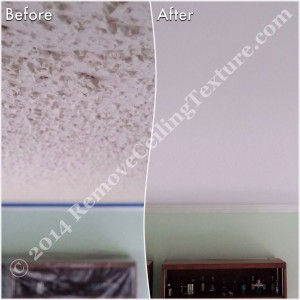
Before and after of ceiling texture removal at a condo at 621 East 6th Ave, Vancouver – Bedroom (3)
7. Not Checking For Liability Insurance
The last thing you want to be dealing with during a renovation is a disaster. However, mistakes happen. Maybe the demo contractor hit a water pipe and flooded your condo, ruining your new flooring and damaging the walls of the condo below you. Not a pleasant situation. What would make it far worse is if they had no insurance to cover the damage. So, while you can’t guard against every possible thing that can go wrong, you can make sure that your contractor is properly insured if something unfortunate does occur.
8. Not Checking for Workers Compensation Coverage
If a worker is injured on the job while working on your home, if the contractor does not have Workers Compensation for his employees, you can be sued by the injured worker. This is a huge reason to check on your contractor’s WCB status.
Some contractors will tell you that you shouldn’t be concerned with their lack of WCB coverage. They will sometimes even offer to sign a waiver which proclaims they will not take legal action against you if they get injured while working on your premises. Such waivers are entirely useless and will not stand up in court.
Your contractor absolutely, positively must have current WCB coverage for the entire time he/she is doing work on your property. This coverage must include the contractor him/herself as well as every member of their team. WCB coverage is not a negotiable item.
9. Not Ensuring There is a Post-Construction Warranty
Many of us are so happy to have the home improvement project completed and to get back to our routine life after the job is finished, that we never think or talk about a warranty. What’s going to happen if this work that your contractor has done, falls apart in the next 6 months? Do you have to pay to have it done again?
Before you commit to any contractor for your home-improvement or home-repair needs, ask them this question. Make sure they write it down in their paperwork and make sure you pick a contractor who is reputable enough so he/she will be around if you need them to do warranty work 6 months from now.
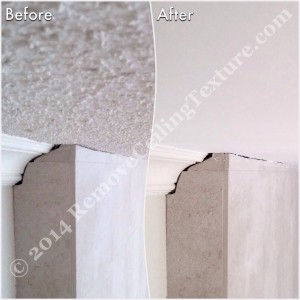
Before and after of ceiling texture removal at a condo at 621 East 6th Ave, Vancouver – Bedroom (4)
Don’t be afraid to bring up any of these subjects with potential contractors. If they are legitimate, they will be open and honest with you. Renovations are stressful enough, so hiring a contractor shouldn’t add to the stress. By avoiding these common mistakes you can make the process as pleasant as possible.
Have a question about your ceilings? Ask the professionals at RemoveCeilingTexture.com!
Are you making these DIY mistakes when it comes to your ceilings?
I have to confess to a mistake I recently made. I walked out of a public washroom with the bottom of my skirt tucked up into my underwear. I’ve heard stories about this happening to other people, but I thought it was an urban myth. How could someone not notice that their assets were on display for everyone to see? My saving grace is that I did notice it quick enough to avoid a ticket for public indecency. We all make mistakes. At least that mistake wasn’t costly. But when it comes to home renovations, DIY mistakes can be expensive. Ceiling mistakes can mean paying twice to get the results that you want. Here are some common pitfalls that homeowners often fall into, when it comes to textured ceilings.
1) Living with popcorn ceilings
It’s entirely likely that you currently live in a home with popcorn ceilings, or you have at some point in your life. They were especially popular in the 1970s – 1990s, but are still being used in new buildings and homes today. That’s because it’s cheaper and easier to spray texture on ceilings, than it is to finish them properly to a smooth surface. What you may not realize, is that you don’t have to live with them. They’re dirty, they collect dust and allergens and they look pretty hideous. A ceiling professional can resurface the texture and give you smooth ceilings that your neighbours will envy.
Before and after ceiling texture removal in the entrance area of a North Delta home.
2) Scraping the popcorn ceiling texture yourself
The DIY movement has everyone thinking they can do everything themselves. For instance, as these pins from Pinterest show, there’s a reason bakeries exist. Unless you’re Martha Stewart, buy a cake from a bakery for a special occasion. The same is true for removing popcorn ceilings. It’s not something that you should do yourself. If you don’t have the right tools, and most importantly the experience for the job, it’s a messy and time consuming job. What takes a professional just a few days, could take you weeks. And once the texture is off, your ceilings are going to look pretty rough unless they’re resurfaced. We’ve had several calls from homeowners looking for help after they tried the DIY approach.
The videos you watch on YouTube which explain the DIY process for getting smooth ceilings, are usually shot with some contractor’s cellphone camera, from 8 feet away, in a dimly lit home! They don’t really show how rough the ceiling looks when the DIY job is finished. Our process has been perfected over the years, and our finished product revolves around applying fresh compound to EVERY SQUARE INCH OF THE CEILING… AT LEAST TWICE! For a Do-It-Yourselfer to do this, it will take weeks.
Before and after popcorn ceiling removal in the living room of a Delta home.
3) Taking ceiling texture samples for asbestos testing to an asbestos abatement company
If you plan on removing your ceiling texture and your home was built prior to 1980, or you don’t know when the ceiling texture was applied, it needs to be tested for asbestos before removing. One mistake people unknowingly make, is to take a sample of ceiling texture to a company that specialized in asbestos abatement. Most of these companies are legitimate, but (and this is a big but), since they have a vested interest in finding asbestos so they can sell you on their abatement services, it is best to take it to a lab that is not involved whatsoever, in the abatement industry. A good lab in the GreaterVancouver area is HBM Environmental. At RemoveCeilingTexture.com, we offer a service to come to your home, professionally obtain a sample and deliver it to the lab. Once the results come back, we notify you and provide you with the report from the lab.
Before and after popcorn ceiling removal in the dining room of a North Delta home.
4) Hiring a contractor inexperienced with ceilings to remove the popcorn ceilings.
While you don’t want to scrape the ceilings yourself, you also don’t want a contractor who is not experienced with ceilings specifically. Ceilings can be tricky to work with. We’ve been contacted by owners who needed us to finish the ceilings after someone inexperienced realized he was not quite skilled enough to complete the job. We’ve also been contacted by contractors themselves who didn’t want to get involved with removing ceiling texture because they weren’t sure they could deliver a quality finish. We work with ceilings every day. We know how to deal with waves in concrete ceilings, cracks around the edges of walls, or cracks running through the middle of the room. We’ve worked on vaulted ceilings and skylights and we’ve fixed water-damaged ceilings.
During photo and after photo of popcorn ceiling removal in the living room of a Delta home.
5) Painting the ceilings yourself
Once your ceilings are smooth, they’ll need to be primed and painted. Just as with ceiling texture removal specialists, professional painters have the skills and tools necessary to create a quality finish. This is especially important when there is a lot of natural light in the space. Any imperfection in the paint will show, so it must be done meticulously and skillfully. In a typical home, walls and floors are usually camouflaged with any number of decorations, including picture frames, cabinets, furniture and floor lamps. Therefore, imperfections will not be glaringly visible. But such is not the case with ceilings. Ceilings receive minimal decoration and therefore, you are more likely to see visible imperfections. This is why it’s so important to have a professional smooth the ceilings, and a professional painter to paint the smooth ceilings.
Finally, painting ceilings is pretty hard on the neck, shoulders and back for people who are not accustomed to it. By having a painter paint your ceilings, you might just avoid a trip to your chiropractor.
Hopefully these tips will prevent you from making committing the typical mistakes that homeowners, and especialy Do-It-Yourselfers make when it comes to dealing with their ceilings. To learn more about RemoveCeilingTexture.com’s texture removal process, or to get a FREEquote, give us a call at 604-420-7578 or contact us by email.
Avoid costly ceiling mistakes by contacting the ceiling experts, RemoveCeilingTexture.com!
Do you or a loved one suffer from asthma or other respiratory illnesses? If so, you know just how valuable good air quality is. You may be shocked to learn that an overlooked part of your home could be affecting your air quality and contributing to asthma symptoms.
Popcorn Ceilings and Asthma Just Don’t Mix
Asthma is a chronic inflammatory disease of the airways. While the cause of asthma is thought to be genetic, many triggers are environmental. We can’t do much about our genes, but we can have some control over our environment. Asthma can be aggravated by allergens. Common allergens found in homes include dust mites, pet dander, pollens and molds. Most people with breathing issues realize that these allergens can get trapped in carpet fibres and so they install laminate, wood or tile flooring. But can you guess where else these allergens love to lurk? That’s right: popcorn ceilings! The nooks and crannies in popcorn ceilings provide the perfect place for allergens to hide and fall back down into the air we breathe. Since popcorn ceilings can’t be cleaned or vacuumed, the best thing is to have them removed.
Ceiling Experts Can Help
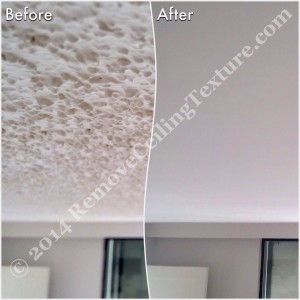
Before and after popcorn ceilings were removed – Bedroom
Popcorn ceiling removal is possible, but should only be done by experienced ceiling professionals. As with any renovation project, there will be some dust involved, so if anyone in your family has asthma or is sensitive to dust, it may be a good idea to stay elsewhere while the ceilings are being worked on. Depending on the size of the home, this could be from 3 – 7 days. Once done, the ceilings will be smooth and you’ll no longer have to worry about hidden allergens. As a bonus, the ceilings will look modern and bright. As our name implies, at RemoveCeilingTexture.com, we specialize in removing ceiling texture. This is what we do day in and day out, so we are experts in our field. If you have popcorn ceilings and asthma, or you just want to get rid of the texture for aesthetic reasons, we can help. To learn more about our removal process, read our Ceiling Refinishing article.
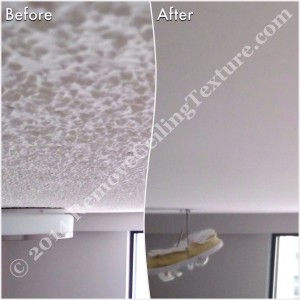
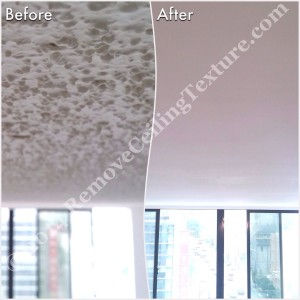
Before and After Photos
Before and after popcorn ceilings were removed – Dining RoomBefore and after popcorn ceilings were removed – Living Room
For more Before and After photos, visit our Flickr page!
If you would like more information about having your popcorn ceilings removed, please contact us by phone at 604-420-7578, or send us an email.
To find out more about popcorn ceiling removal, or to get a FREE quote, contact us today!
Ceiling texture removed by professional ceiling contractors at a Vancouver condo – Bedroom at 1331 Homer St.
The Importance of Hiring Professional Ceiling Contractors
Professional ceiling contractors can make all the difference when it comes to having your ceiling texture removed. An inexperienced contractor who is not familiar with ceiling texture can cause delays in your project, and the end results can be less than ideal.
We were contacted by new homeowners on Homer Street in Vancouver. They had just purchased their first condo and while they were excited about this, they were not thrilled with the textured ceilings. One of the first things they planned for, before moving in, was ceiling texture removal. Unfortunately for them, they hired someone with very little experience with ceilings.
They were promised a three-day job by their contractor. By the end of the first day, the frustrated contractor had completed only one small room and told them there was no way he could finish the job for them. Needless to say, the homeowners were pretty frustrated too. When dealing with ceilings, especially concrete ceilings, it’s important to hire professional ceiling contractors. Some drywall contractors and general handymen may think that removing popcorn ceilings is no big deal, but they often find they are in over their heads, as was the case in this instance.
RemoveCeilingTexture.com was then contacted. The homeowners were a bit panicked by this time because they were anxious to move in. We had a look at the ceilings and assured them it would be no problem for us, as we’ve done many concrete ceilings. In fact, we had done a condo in the very same building. They were happy with this news and agreed for us to start the following week. We soon had the texture removed in their condo and resurfaced the ceilings to a flat, smooth surface.
Here are some before and after photos from this project:
Close-up view of corner after ceiling texture removal at a condo at 1331 Homer St., VancouverSmooth ceilings appear higher – Vancouver condo at 1331 Homer St.
Once professional ceiling contractors were called in, the texture removal went smoothly: Living room with smooth ceilings – condo at 1331 Homer St, Vancouver
Riding the Waves
It’s especially important to hire professional ceiling contractors when dealing with the concrete ceilings of highrise buildings. The ceilings are sometimes wavy due to inconsistencies in the forms used when they pour the concrete. At RemoveCeilingTexture.com, we resurface the ceilings by hand and can adjust for these waves.
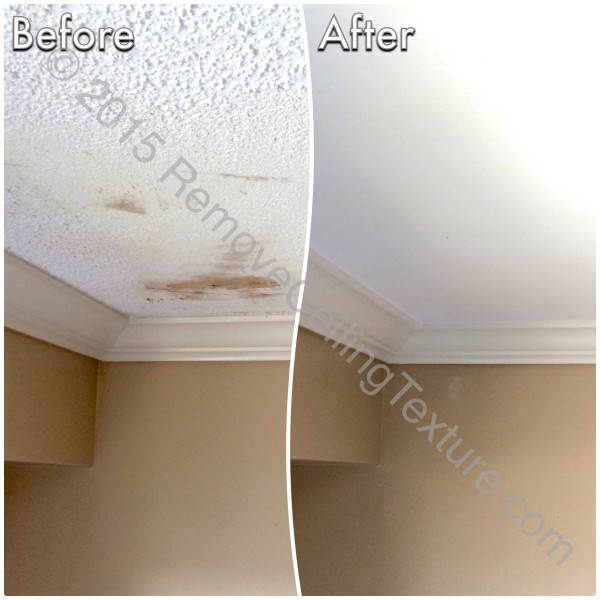
This “During and After” photo shows a ceiling that had the texture removed by someone inexperienced. We were later called in to fix the dips that were apparent. If we had been contacted from the start, the homeowner would not have had to pay twice for flat ceilings.
Once RCT filled in the waves, resurfaced the ceiling and painted it, it was perfect.
If you have popcorn ceilings that you’d like to have removed, contact the professionals at RemoveCeilingTexture.com. As experts in the ceiling industry, we get the job done right the first time. Call us at 604-420-7578 or contact us by email.
Contact the ceiling professionals at RemoveCeilingTexture.com today for a FREE quote on ceiling texture removal!
Before and after: Ceiling texture removal in Burnaby – Bedroom
Ceilings are so often overlooked in home design. At RemoveCeilingTexture.com we believe that you should love your ceilings as much as you love the rest of your home. We’ve never heard anyone say that they love their ceiling texture, but we have had people tell us how much they love their smooth ceilings after we’ve worked on them.
What’s to Love About Smooth Ceilings?
It’s important to feel a sense of peace and comfort in your home. After all, it’s your refuge from this crazy world we live in. They may go mostly unnoticed, but that doesn’t mean that ceilings don’t affect the feel of your home. Dingy texture can make your home feel dark and oppressive. The difference between walking into a home with popcorn ceilings and one with smooth ceilings is quite noticeable. And not only do smooth ceilings invoke a sense of cleanliness, but they actually are cleaner. Because there are no nooks and crannies for dust to hide in, smooth ceilings are better for your health.
Feeling the Love in Burnaby and West Vancouver
This townhome in Burnaby had ceilings that were definitely less than loveable. The old ceiling texture was crumbly and dirty and needed to go. Smooth ceilings transformed the space into a much more pleasant place to be.
Before and after: Ceiling texture removal in Burnaby – Dining RoomBefore and after: Ceiling texture removal in Burnaby – Living Room
The owner of this West Vancouver home decided to have his ceiling texture removed at the same time as some other renovations. While it’s always a good time to get smooth ceilings, if you’re already planning renovations, starting with your ceilings is ideal.
Before and after: Ceiling texture removal in West Vancouver – Living RoomBefore and after: Ceiling texture removal in West Vancouver – Close-up
Whether you want ceiling texture removal for aesthetic reasons or health reasons, we’re certain you will love your ceilings once they’re smooth. Contact us today for a FREE quote on smooth ceilings. Call us at 604-420-7578 or contact us by email.
We’ve come a long way from tie-dyed skirts and leather-fringed vests. The interiors of our vehicles are no longer covered in thick shag carpeting (did no one see the respiratory health hazard there?). Any college-age kid will give you a blank stare if you mention the 8-track. And the beloved toys from the 70s and 80s are no competition for the electronic toys that today’s kids are zombiefied entertained by.
So why is it that our ceilings haven’t made the same metamorphosis out of that era? You’ve moved on from 1970s hairstyles (hopefully); isn’t it time to leave other relics of those days, like popcorn ceilings, behind too? Fortunately, popcorn texture removal is an option and smooth ceilings will transport your home into the modern age, where it belongs.
Popcorn Texture Removal – It Takes All Kinds
At RemoveCeilingTexture.com we see all sorts of ceiling texture. From the thick, chunky, popcorn-style texture popular in the 60s, 70s and 80s:
Popcorn texture removal at a home in North Vancouver
To the more subdued texture that is still being applied to new homes today:
This North Vancouver home gets popcorn texture removal after installing potlights
We’ve even seen ceiling texture that looked like it belonged in some primeval cave:
Before & after of popcorn texture removal in Langley – Living room
And we’re not sure what look they were going for with this bizarre texture:
Before and after of texture removal in Coquitlam
No matter the type of texture you have, popcorn texture removal will transform your home.
** If your home was built prior to 1982, your ceiling texture could contain asbestos. It’s important not to scrape this texture. Read more about our process for ceilings containing asbestos here.
Ceiling Repair and Popcorn Texture Removal
Here’s a look at a ceiling we recently worked on at a condo in downtown Vancouver. The homeowner had removed a wall so we repaired the ceiling at the same time that we did the popcorn texture removal.
Kitchen before and after of popcorn texture removal at a Vancouver CondoLiving room before and after of popcorn texture removal at a condo in Vancouver
Ceiling repair and popcorn texture removal at downtown Vancouver condo
You can read more about our process for popcorn texture removal here. Or contact us–we’re happy to answer any questions you have. Our quotes are FREE and there is no obligation. Give us a call at 604-420-7578, or contact us by email to find out how popcorn texture removal can improve your home.
Want to bring your home out of the 1970s with popcorn texture removal? Contact us today for more information!
Covering Popcorn Ceilings: Before and after photo of a dining room in Delta
If you’re reading this, you probably have popcorn ceilings that you’d like to have disappear forever. Welcome to the club–we hate them too.
At RemoveCeilingTexture.com, as our name points out very clearly, we remove ceiling texture. But what we really do is provide smooth ceilings. And while the end product of smooth ceilings is always the same, our method to achieve this sometimes differs.
Our usual process is to grind the texture down with a special machine made for the ceiling industry, then we resurface the ceilings using a hawk and trowel method. The final step is a light sanding and then your ceilings are done and ready for paint. However, in some cases it’s preferable to skip the grinding step and start with the resurfacing. This means that the texture will remain on your ceilings, but it will be covered up and sealed with the compound that we use for resurfacing.
When is Covering Popcorn Ceilings Preferable?
Covering Popcorn Ceilings: Before and after photo of a hallway in Delta
If you live in a home that was built prior to about 1982, there is a chance that your ceiling texture could contain asbestos. Asbestos was used for various reasons (read our article about asbestos for more information). Anytime there is asbestos involved, you do not want to scrape it. Scraping can cause the asbestos fibres to become airborne, which is when they can be dangerous. The only way to know for sure if there is asbestos is to have a lab examine a sample under a microscope. In cases where asbestos is confirmed (or suspected, but an asbestos test has not been done), we always skip the grinding and instead cover the texture directly with our compound. This seals in the texture and any possible asbestos fibres. The ceilings then get at least two more coats of the compound to ensure proper coverage and to make sure your ceilings are smooth.
Will Covering Popcorn Ceilings Make My Ceilings Shorter?
Covering Popcorn Ceilings: Before and after photo of a bedroom in Delta
When covering popcorn ceilings, we make sure to apply very thin layers of compound. Since we apply it by hand, we can control the depth of the compound and only put enough to cover the texture and make the ceilings smooth. They will be a small fraction of an inch shorter but it won’t be noticeable. In fact, the smooth ceilings will actually make the room feel larger and brighter. It’s surprising how popcorn ceilings can make a space feel small and restricted. People often don’t even notice this until the ceilings are smooth. It’s like a weight has been lifted from the room.
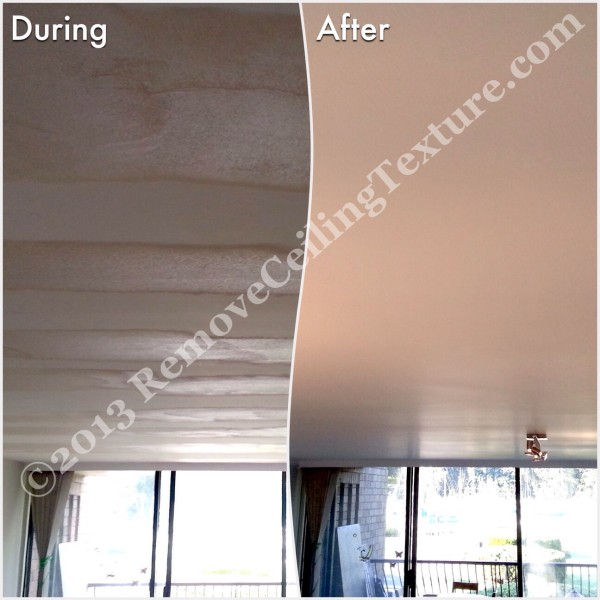
The Before & After images throughout this article are from a home in Delta that we worked on. We applied our compound directly onto the popcorn instead of removing it first. Below are some “During” photos of this project.
Covering Popcorn Ceilings: During photo – bedroomCovering Popcorn Ceilings: During photo – dining room
Covering Popcorn Ceilings: During photo – hallway
Whether the popcorn needs to be removed or covered, RemoveCeilingTexture.com can provide you with smooth ceilings. Contact us today for a FREE quote! Give us a call at 604-420-7578 or contact us by email.
Want your popcorn ceilings covered or removed? Contact RCT today for a FREE quote!